How to Create a Mail Merge Campaign
Introduction
Section titled “Introduction”Creating a mail merge campaign allows you to send personalized emails to a large number of recipients efficiently. BetterMerge (formerly Mailway Mail Merge) offers powerful tools to help you set up, customize, and manage your campaigns directly from Google Sheets. This guide will walk you through the process of creating a new mail merge campaign using BetterMerge, from selecting your recipients to reviewing and launching your campaign.
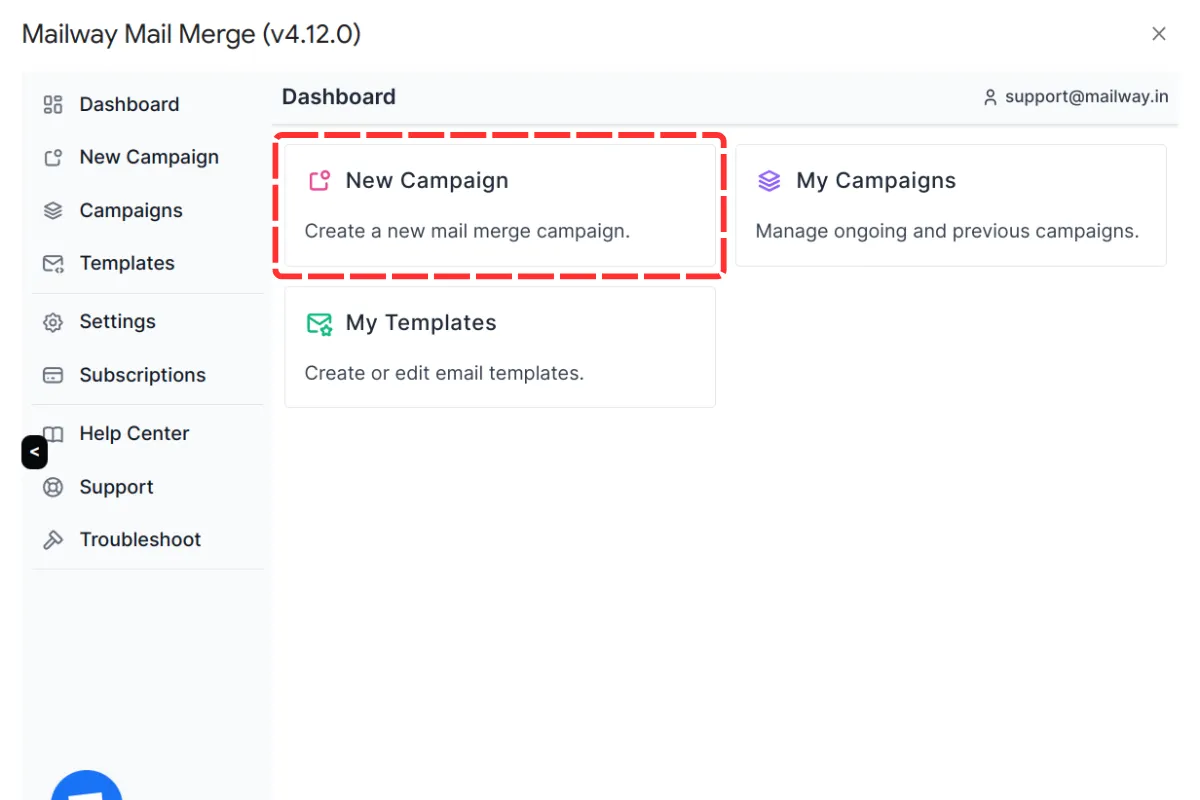
Step 1: Start a New Campaign
Section titled “Step 1: Start a New Campaign”To begin, open the Mailway Mail Merge (BetterMerge) add-on in Google Sheets. From the main menu, click on the ‘New Campaign’ button to start setting up your mail merge campaign.
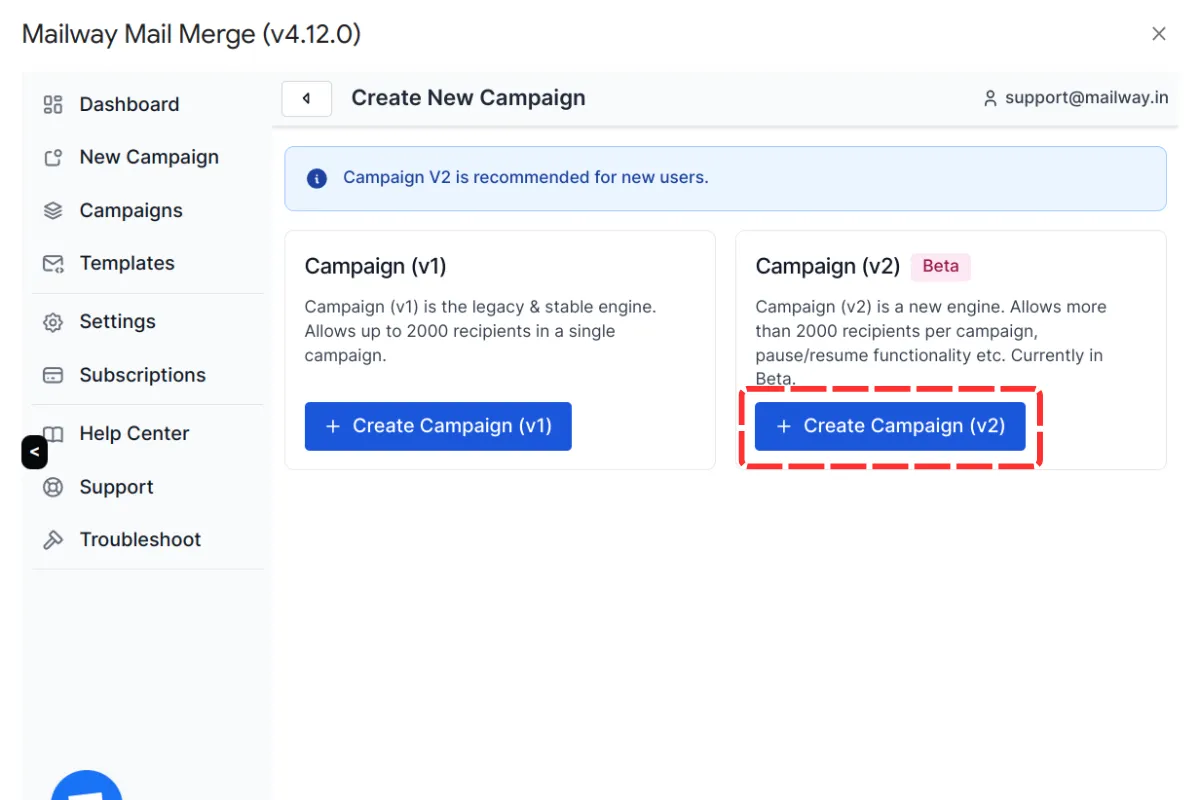
Step 2: Choose the Campaign Version
Section titled “Step 2: Choose the Campaign Version”BetterMerge (formerly Mailway Mail Merge) offers two versions of the campaign engine: v1 (legacy) and v2 (new).
- v1 (Legacy): This version is stable but has fewer features and supports fewer recipients.
- v2 (Recommended): The newer engine, currently in beta, allows for more than 2,000 recipients per campaign. It supports dynamic recipient management, where you can add or remove recipients even after the campaign starts. New features will be added exclusively to this version.
For most users, it’s recommended to choose ‘Create Campaign (v2)’ to take advantage of these enhancements.
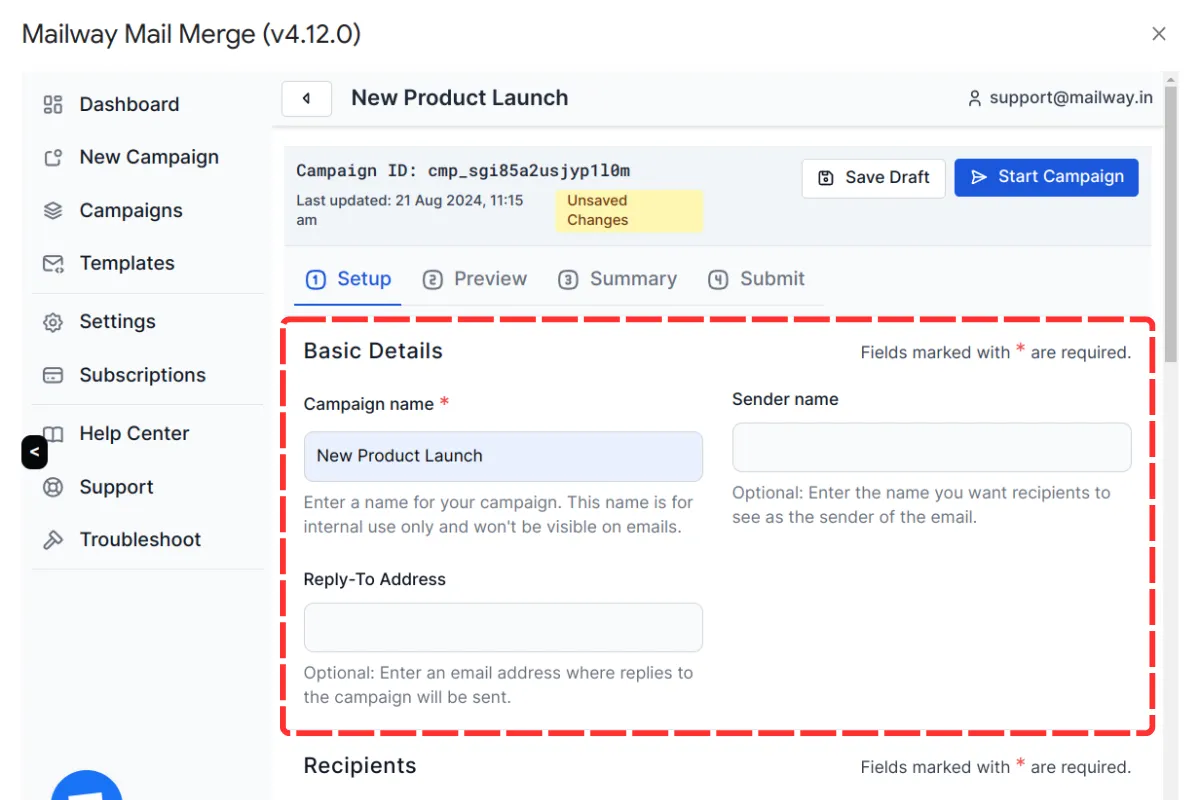
Step 3: Enter Basic Details
Section titled “Step 3: Enter Basic Details”In the campaign editor page, the first section you’ll encounter is ‘Basic Details.’ Here, you need to fill out the following fields:
- Campaign Name: (Required) This name is for your reference and will not be visible in the emails.
- Sender Name: (Optional) This will appear in the ‘From’ field of the email.
- Reply-to Address: (Optional) Specify the email address to which replies should be sent.
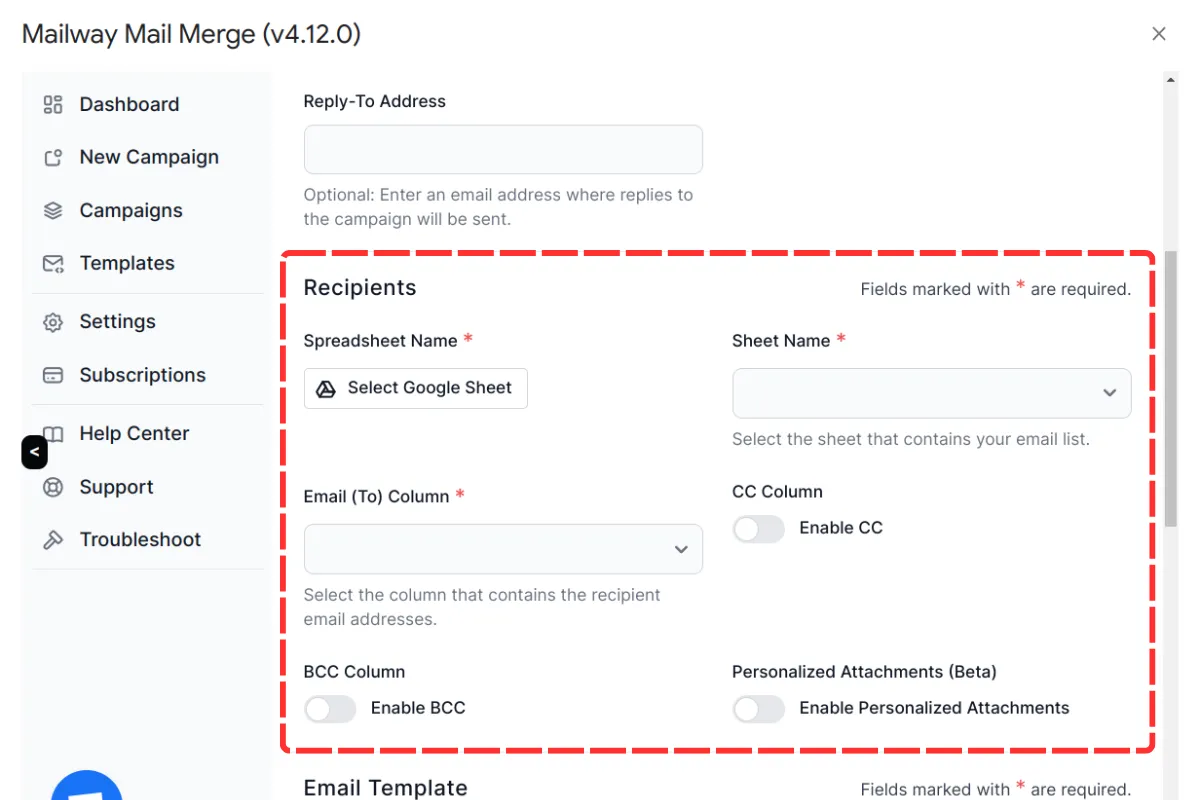
Step 4: Select Recipients
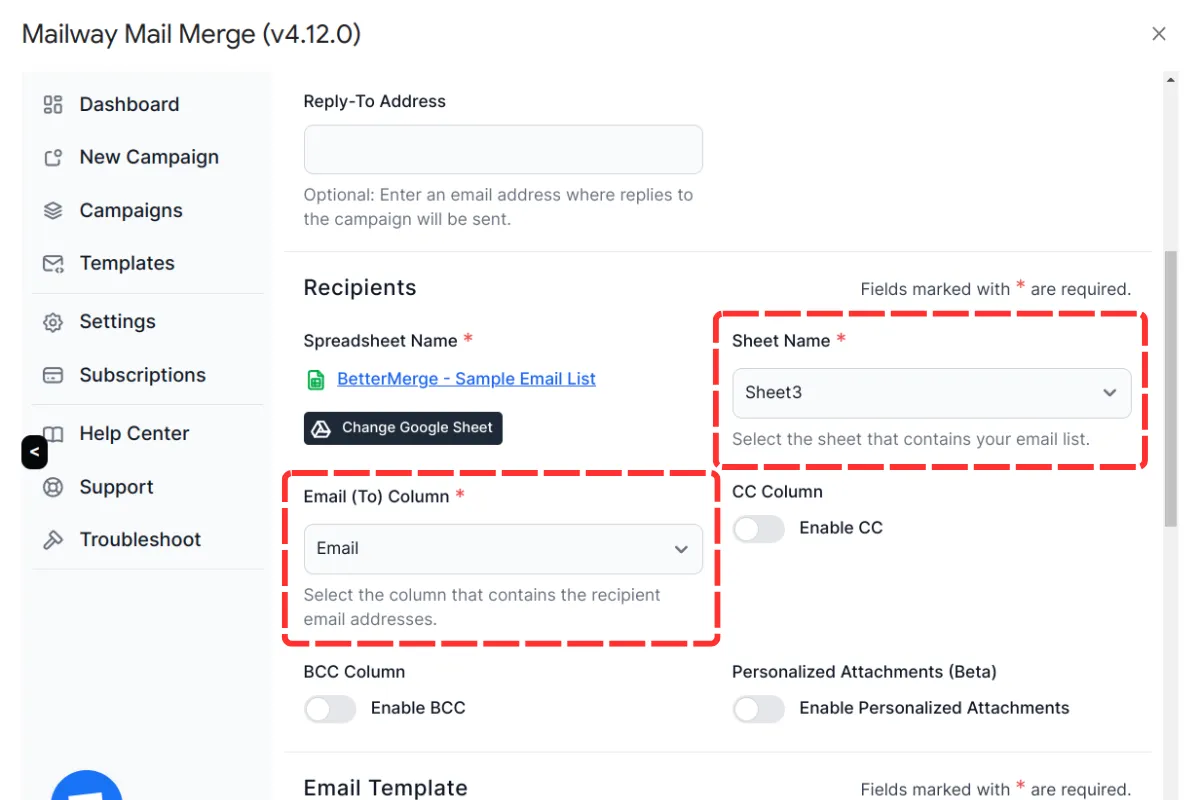
Section titled “Step 4: Select Recipients”The next section is ‘Recipients,’ where you’ll select who will receive your emails.
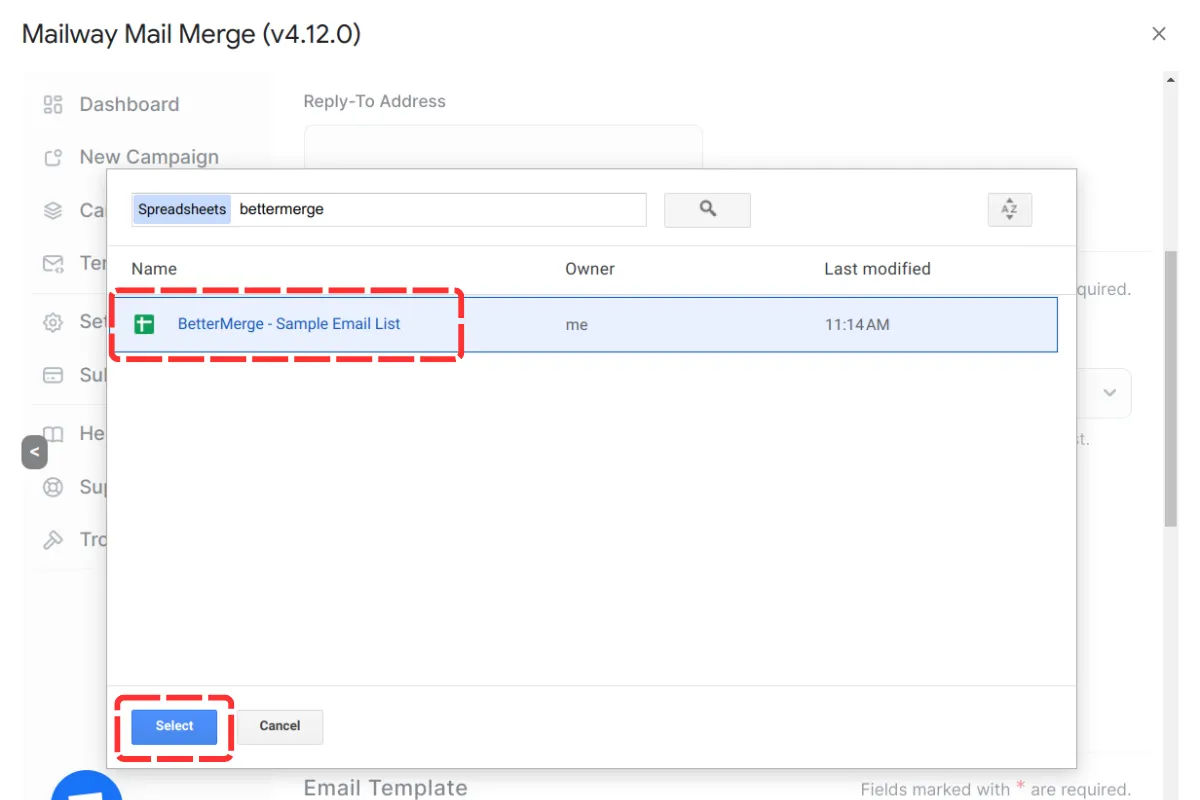
- Spreadsheet Name: Click ‘Select Google Sheet’ to open the Google Drive Picker UI. Choose the Google Sheet that contains your recipient list.
- Sheet Name: After selecting a Google Sheet, choose the specific sheet that holds your contact information.
- Email (To) Column: Select the column in your Google Sheet that contains the email addresses of your recipients.
You also have the option to add CC and BCC recipients:
- CC Column: Enable CC by toggling the switch, then select the column with the CC email addresses.
- BCC Column: Similarly, enable and select the column for BCC email addresses if needed.
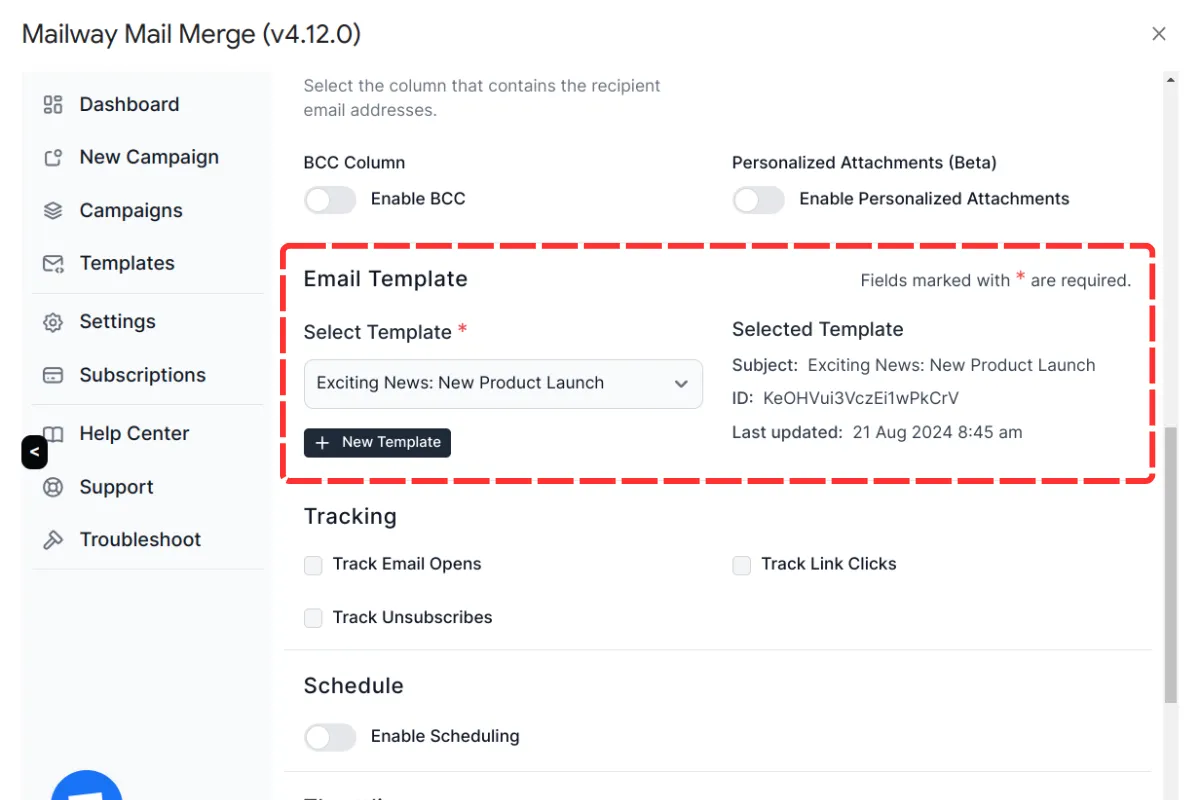
Step 5: Choose an Email Template
Section titled “Step 5: Choose an Email Template”In the ‘Email Template’ section, select the template you wish to use for this campaign. A dropdown menu will list your most recent 10 templates, making it easy to choose the right one.
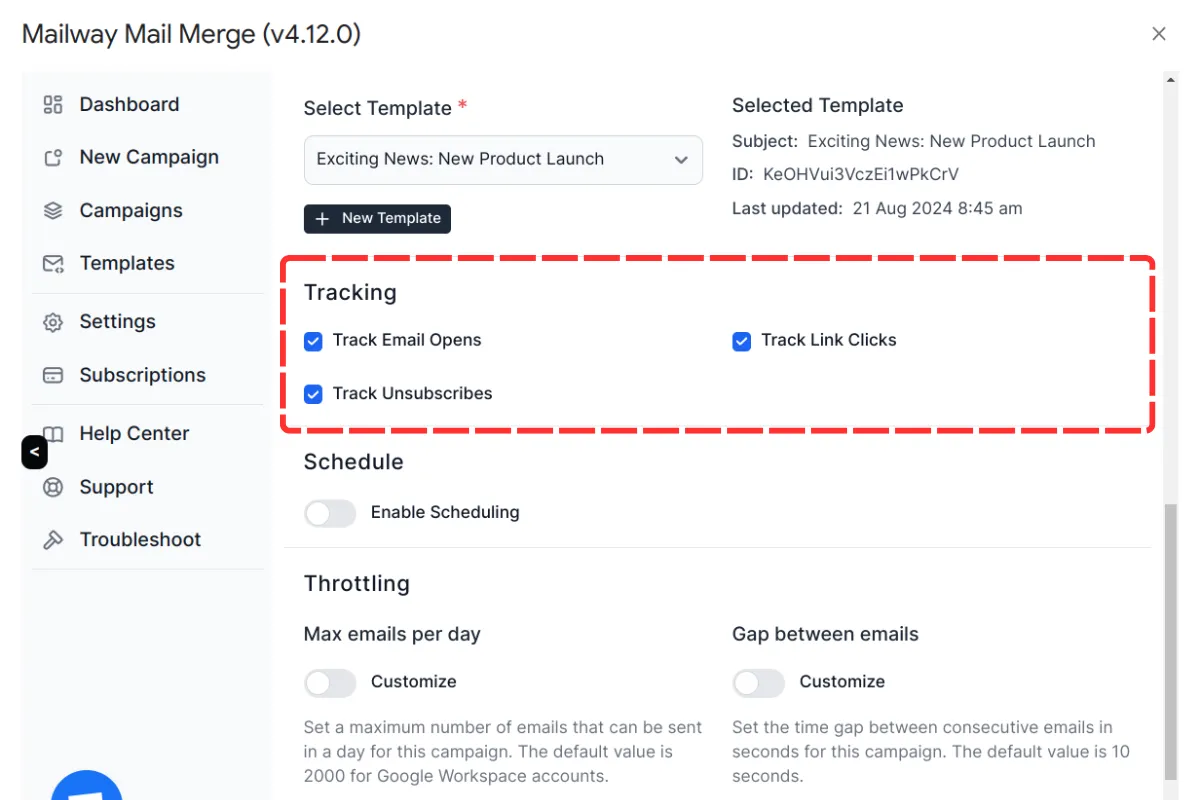
Step 6: Configure Tracking Options
Section titled “Step 6: Configure Tracking Options”BetterMerge (formerly Mailway Mail Merge) allows you to track various metrics for your campaign. In the ‘Tracking’ section, you can enable:
- Track Email Opens
- Track Link Clicks
- Track Unsubscribes
These options are optional, and you can activate them by checking the relevant boxes.
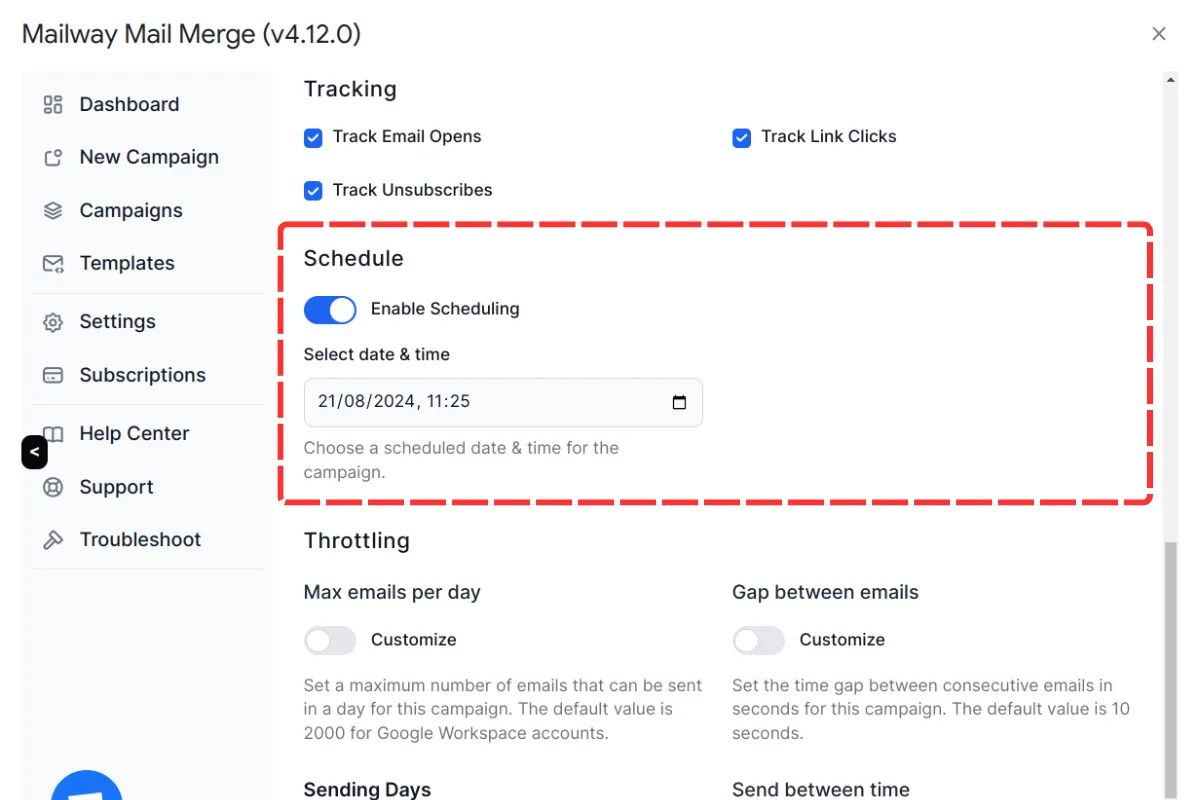
Step 7: Schedule Your Campaign (Optional)
Section titled “Step 7: Schedule Your Campaign (Optional)”If you want to schedule your campaign to send at a later time, enable the ‘Enable Scheduling’ toggle. This will reveal a ‘Select date & time’ field where you can pick a future date and time in your local timezone.
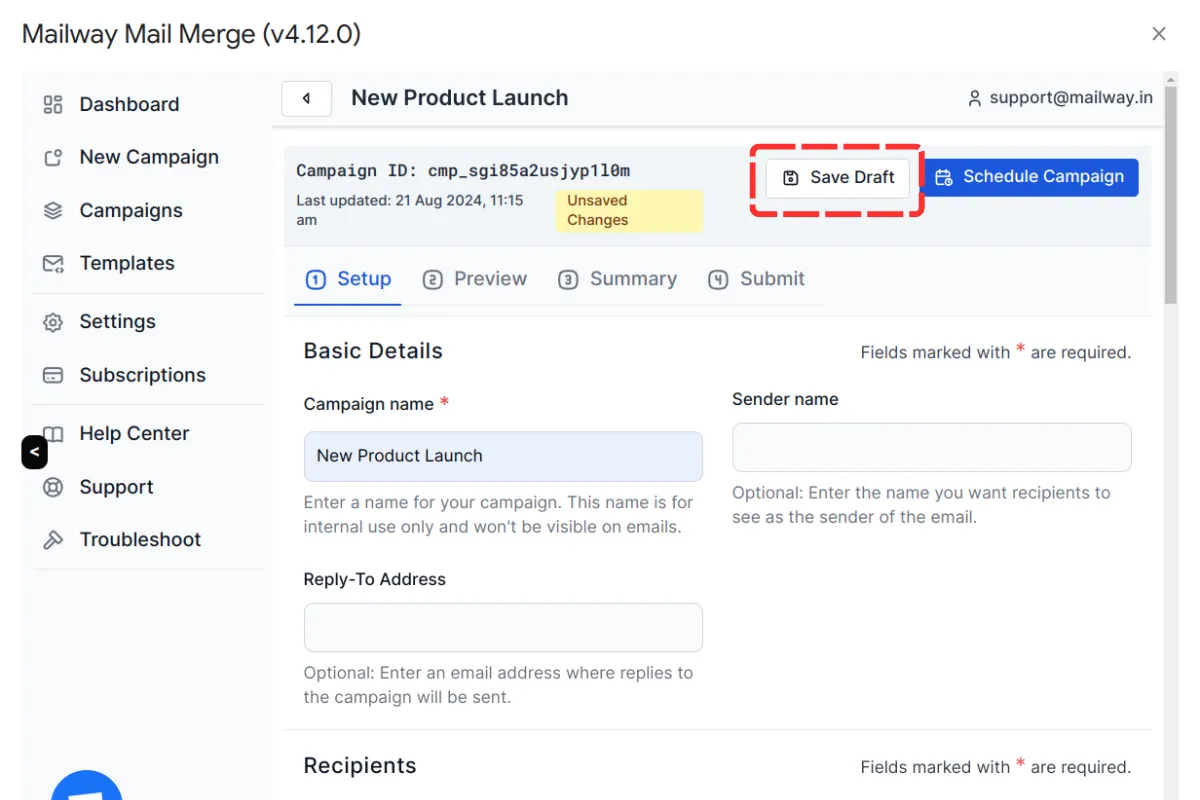
Step 8: Save Your Campaign as a Draft
Section titled “Step 8: Save Your Campaign as a Draft”Once you’ve filled out all the necessary details, scroll to the top of the campaign editor and click on ‘Save Draft.’ Saving your campaign as a draft allows you to revisit and edit it later if needed. This feature is particularly useful if you want to double-check your settings or make adjustments before sending.
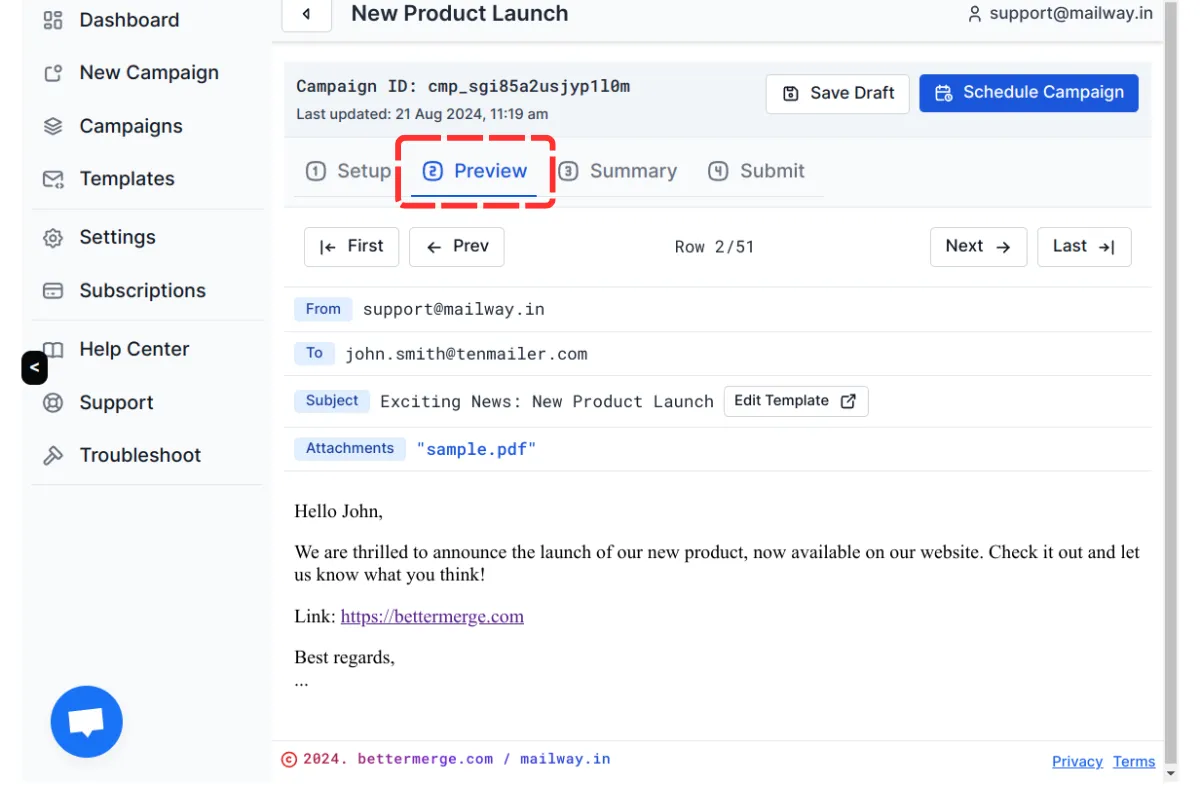
Step 9: Preview Your Emails
Section titled “Step 9: Preview Your Emails”To ensure everything looks correct before sending, navigate to the ‘Preview’ tab. This tab allows you to view how your email will appear to each recipient. You can move between different recipient rows using the navigation buttons (‘First,’ ‘Prev,’ ‘Next,’ ‘Last’). The preview will display key email components such as ‘From,’ ‘To,’ ‘Subject,’ ‘Attachments,’ and the email body.
- The navigation bar shows your position in the recipient list, like ‘Row 1/11.’
- The email viewer UI below gives you a complete preview of the email content.
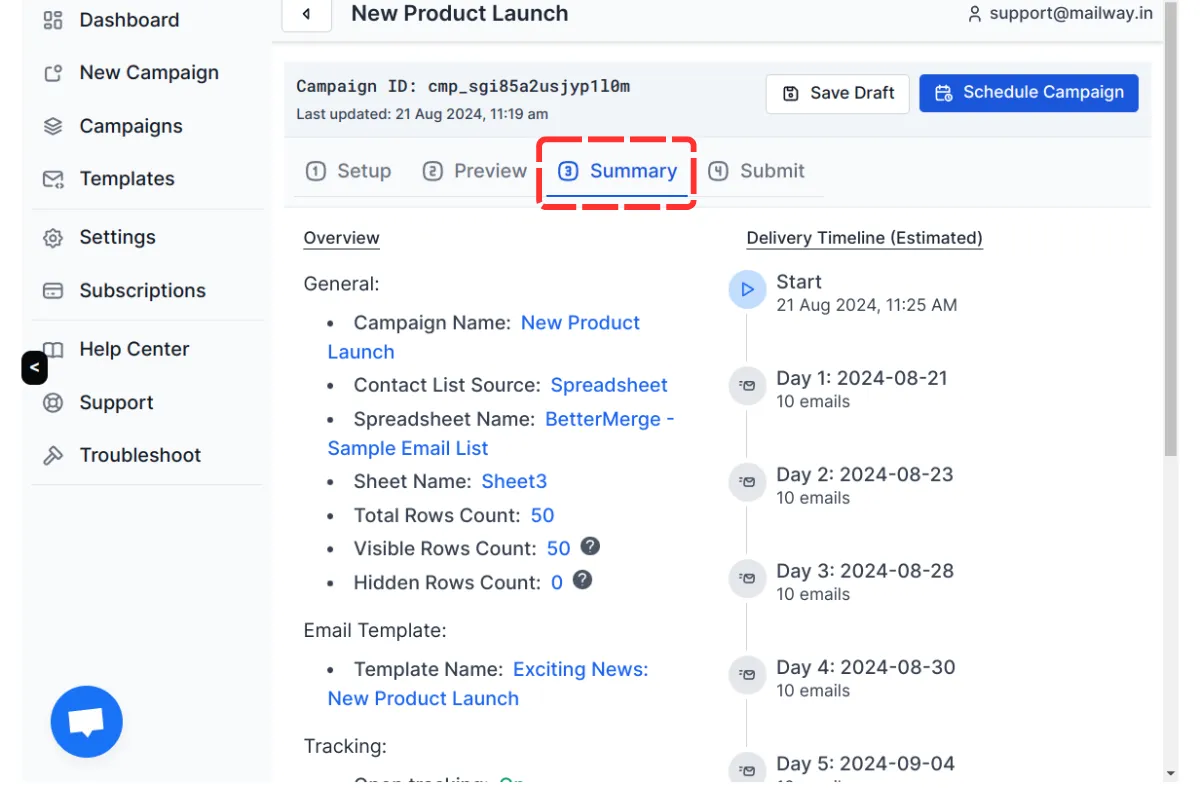
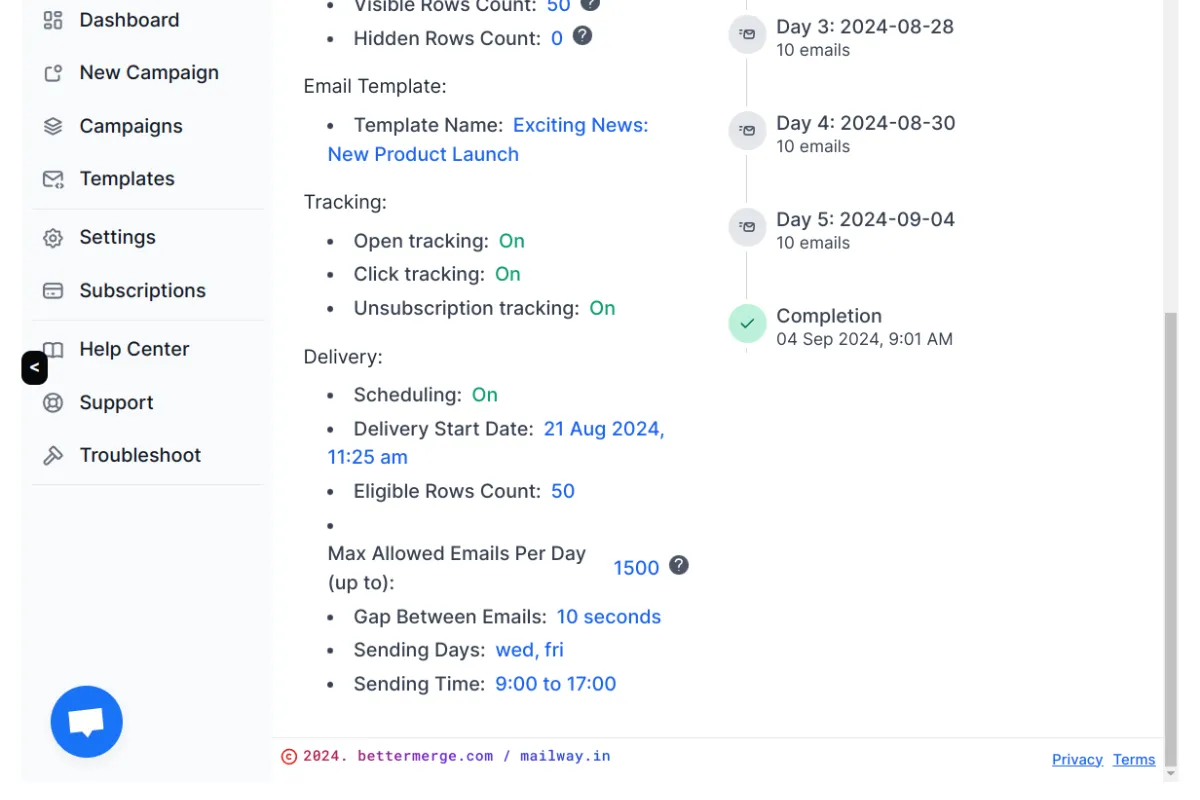
Step 10: Review the Campaign Summary
Section titled “Step 10: Review the Campaign Summary”Before launching your campaign, head over to the ‘Summary’ tab to review all the details in one place. This summary includes:
- Campaign Name
- Recipient Source: Spreadsheet and sheet name, row count (visible and hidden rows)
- Email Template Name
- Scheduling: Whether the campaign is scheduled or to be sent immediately
- Tracking Options: The tracking metrics you’ve enabled
- Estimated Delivery Timeline: A date-wise estimate of when emails will be delivered
This summary gives you a final chance to verify all settings before proceeding.
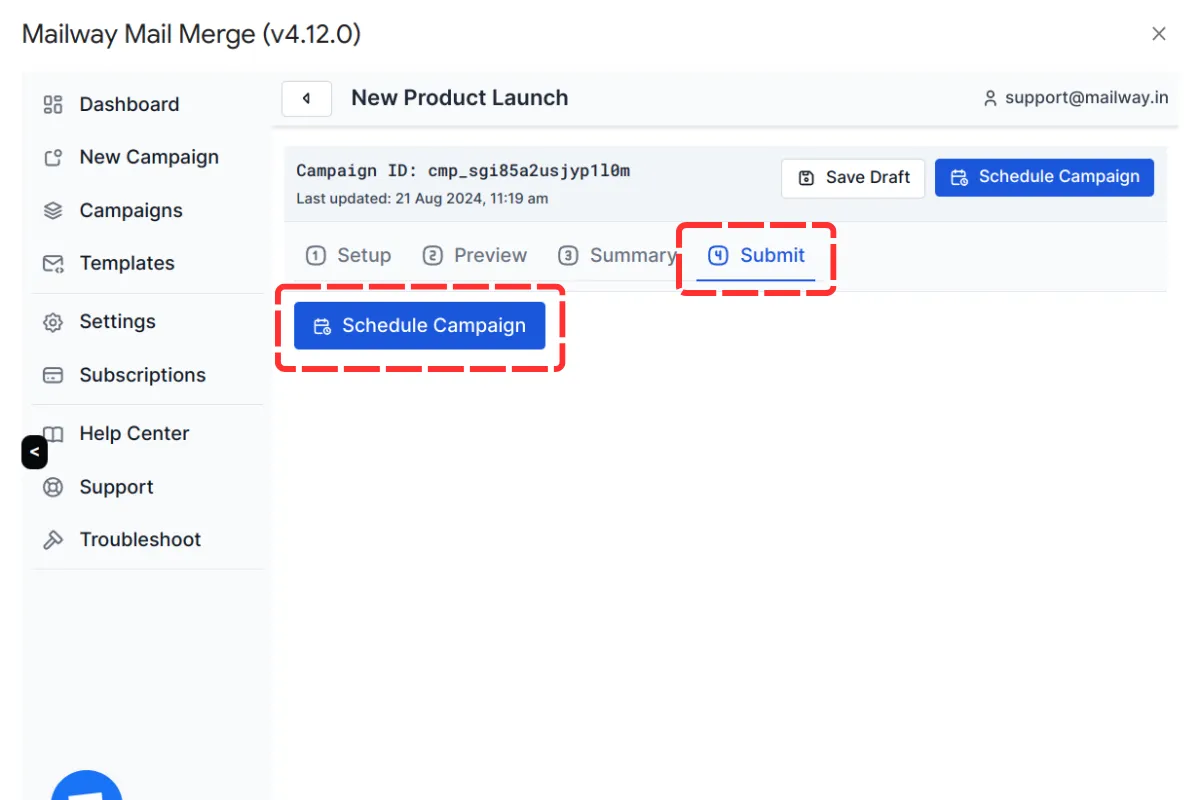
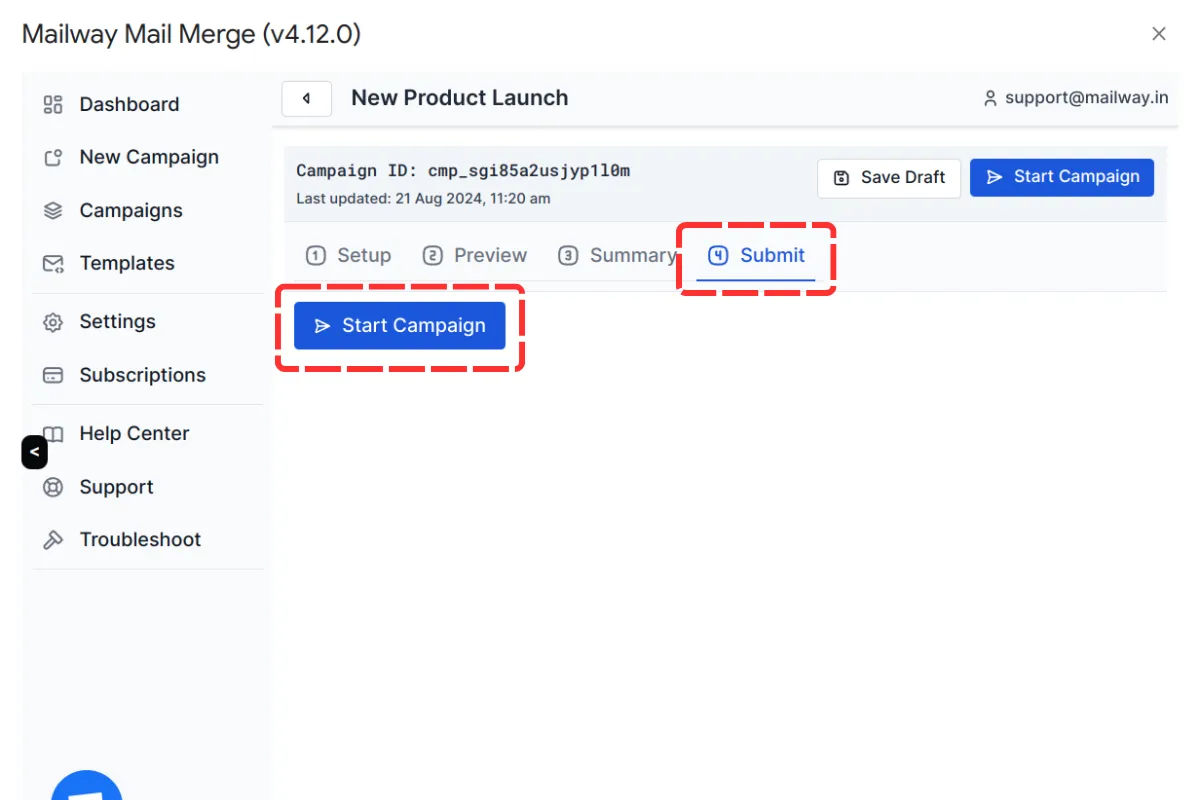
Step 11: Submit Your Campaign
Section titled “Step 11: Submit Your Campaign”Once you’ve reviewed the summary and are satisfied, move to the ‘Submit’ tab. Depending on whether you’ve scheduled the campaign or are sending it immediately, the button will either read ‘Schedule Campaign’ or ‘Start Campaign.’ Click this button to initiate your campaign.
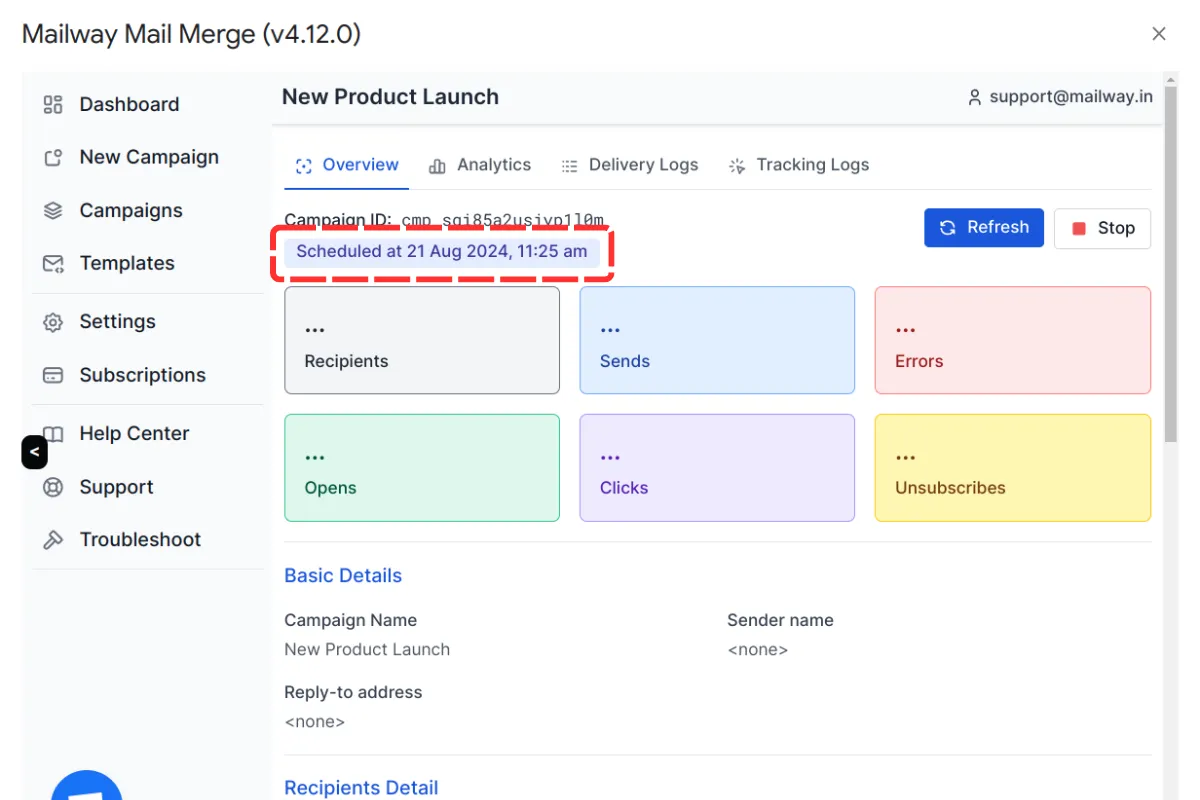
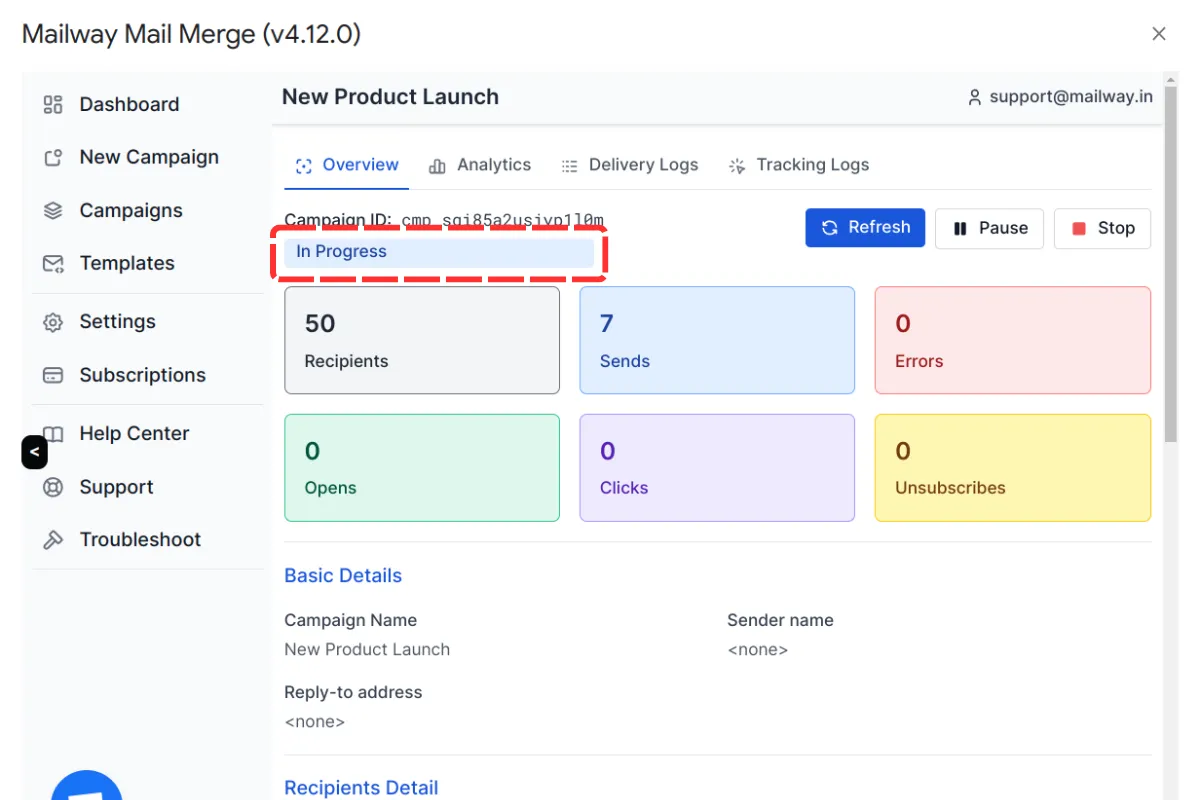
Step 12: Monitor the Campaign Report
Section titled “Step 12: Monitor the Campaign Report”After submitting your campaign, you’ll be taken to the ‘Campaign Report’ page. This page provides real-time updates on the campaign’s progress, including:
- Campaign ID and Status: Shows whether the campaign is ‘Scheduled,’ ‘In Progress,’ or ‘Completed.’
- Control Buttons: Refresh data, pause, resume, or stop the campaign.
- Statistics: Displays the number of recipients, emails sent, opens, clicks, unsubscribes, etc.
You can refresh the report to see updated stats, pause the campaign if needed, or stop it altogether.
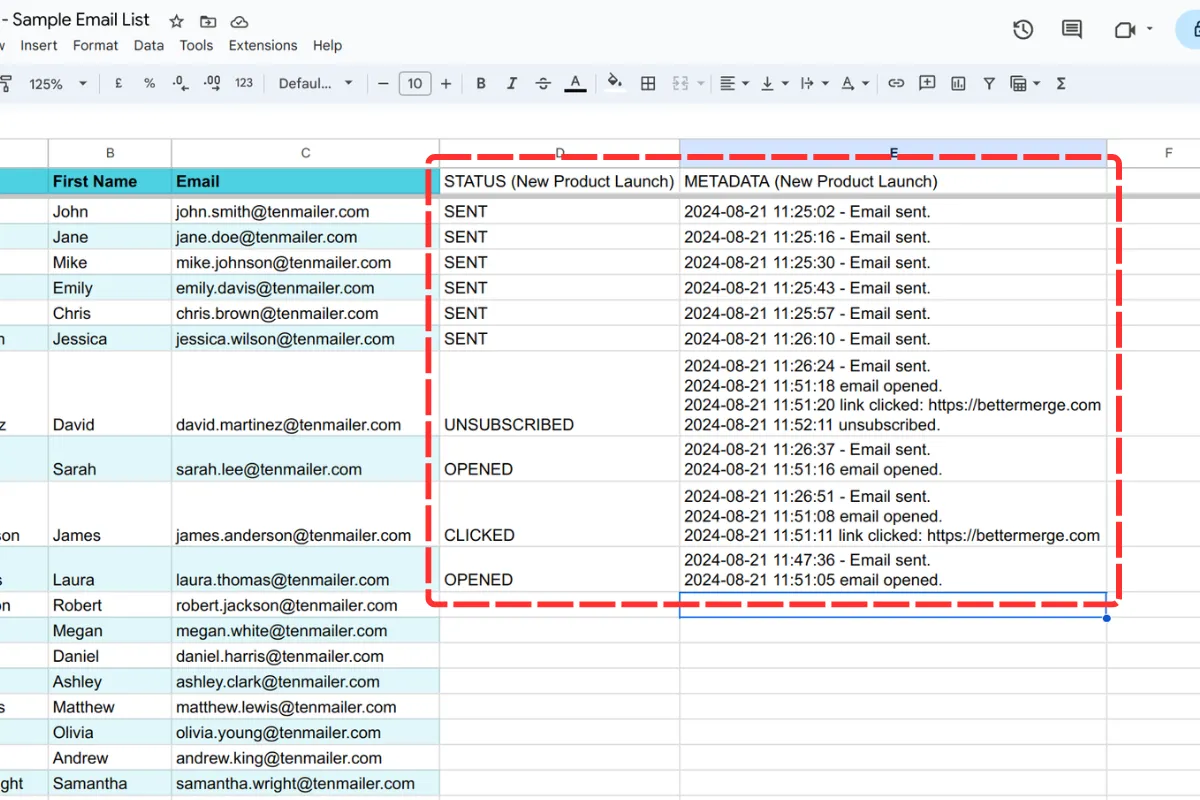
Step 13: Track Progress in Google Sheets
Section titled “Step 13: Track Progress in Google Sheets”In addition to the Campaign Report page, BetterMerge (formerly Mailway Mail Merge) also updates your Google Sheet with real-time logs. Two new columns, ‘STATUS’ and ‘METADATA,’ will be added:
- STATUS: Displays the status of each email (e.g., ‘SENT,’ ‘OPENED’).
- METADATA: Provides detailed logs, including timestamps and additional information.
You can monitor these updates directly within your Google Sheet to keep track of the campaign’s progress.
Conclusion
Section titled “Conclusion”By following these steps, you’ve successfully created and launched a mail merge campaign using BetterMerge (formerly Mailway Mail Merge). This powerful tool allows you to personalize emails, manage recipients dynamically, and monitor campaign performance—all within Google Sheets. Whether you’re sending a small batch of emails or reaching thousands of recipients, BetterMerge streamlines the process, helping you achieve your email marketing goals with ease.
BetterMerge is an independent product not affiliated with, endorsed by, or connected to Google LLC. Gmail, Google Sheets, Google Workspace, and Google Workspace Marketplace are trademarks of Google LLC.