Most “Gmail automation” is one of five jobs: sending an email later, replying to the same question for the hundredth time, sending the same reminder every week, answering while you’re away, or sending one message to a list of people. Gmail handles the first four on its own. The fifth needs a spreadsheet and a little help.
Here’s how to set up each one, starting with the built-in options.
1. Send an email later with Schedule send
This is the simplest automation in Gmail and the one people use most.
Write your email as usual.
Click the small arrow next to Send.
Choose Schedule send, then pick a suggested time or Pick date & time.
On the mobile app, tap the three-dot menu in the top right and choose Schedule send.
Scheduled emails wait in the Scheduled folder in the left sidebar. To change one, open it and click Cancel send. It goes back to your drafts, where you can edit it and schedule it again. You can have up to 100 scheduled emails at a time, and they send from Google’s servers, so your computer can be off.
One thing to watch: the time you pick is in your own timezone. If you’re writing to someone eight hours ahead, work out their morning, not yours.
2. Auto-reply to specific emails with templates and filters
If you answer the same kinds of questions over and over (pricing requests, “is this role still open?”, support messages to a shared address), Gmail can send a saved reply for you.
First, turn on templates:
Go to Settings (the gear icon) > See all settings > Advanced.
Next to Templates, choose Enable, then Save Changes.
Then save your reply as a template. Write it in a new compose window, open the three-dot menu at the bottom right, and choose Templates > Save draft as template > Save as new template.
Now connect it to a filter:
In the Gmail search bar, click Show search options (the sliders icon on the right).
Enter what should trigger the reply. That could be a sender, a word in the subject (“pricing”), or the address the email was sent to.
Click Create filter.
Tick Send template and choose your template.
Every new email that matches gets your template as a reply. Keep the criteria narrow. A filter that matches too broadly will send your canned reply to people who didn’t ask for it, and you won’t notice until someone replies confused.
3. Reply while you’re away with the vacation responder
For time off, the vacation responder is simpler than a filter.
Go to Settings > See all settings > General.
Scroll to Vacation responder and turn it on.
Set the first and last day, a subject, and the message.
Click Save Changes.
You can limit replies to people in your contacts, which keeps your auto-reply away from newsletters and cold pitches. Gmail also won’t spam anyone: a person who emails you several times gets the reply once, and then again only if they write after four days have passed.
4. Send recurring emails with Google Apps Script
Gmail has no “repeat every Monday” option. If you need a weekly reminder, a monthly report nudge, or a daily check-in, Google Apps Script can do it for free. It’s less scary than it sounds. You paste a few lines and set a timer.
Replace the sample code with this, changing the address, subject, and message:
function sendWeeklyReminder() { GmailApp.sendEmail( ”[email protected]”, ”Reminder: timesheets are due Friday”, ”Hi all,\n\nQuick reminder to submit your timesheets by 5 PM Friday.\n\nThanks!” );}
Click Save, then Run once. Google will ask you to authorize the script to send email as you.
Open Triggers (the clock icon in the left sidebar) and click Add Trigger.
Choose sendWeeklyReminder, set the event source to Time-driven, pick Week timer, then choose the day and a time window.
The email now goes out every week without you touching it. Scripts have their own sending limit: 100 recipients a day on a personal Gmail account and 1,500 on Google Workspace.
This works well for a fixed message to a fixed address. Once you want each email to say something different (a name, an amount, a due date), you’re writing a mail merge by hand, and the next option is easier.
5. Send personalized emails to a list with mail merge
This is where Gmail on its own runs out. Say you need to email 200 clients about renewals, and each email should mention their name, plan, and renewal date. Gmail’s options aren’t great:
BCC everyone. Everyone gets the identical message with no personalization. Big BCC lists also look like bulk mail to spam filters.
Gmail’s built-in mail merge. It’s decent, and it can even pull merge tags from a linked Google Sheet. But it’s only on certain paid Google Workspace plans (not personal Gmail), it caps you at 1,500 recipients a day, and it can’t be combined with Schedule send.
Copy, paste, and edit 200 times. Slow, and one wrong name in the wrong email is all it takes.
Mail merge solves this properly. You keep your recipients in a Google Sheet, one row per person and one column per detail. You write the email once with placeholders like {{First Name}} and {{Renewal Date}}. Each person then gets their own individual email from your Gmail address, filled in with their row.
BetterMerge works this way, as a Google Sheets add-on plus a web dashboard. The basic workflow:
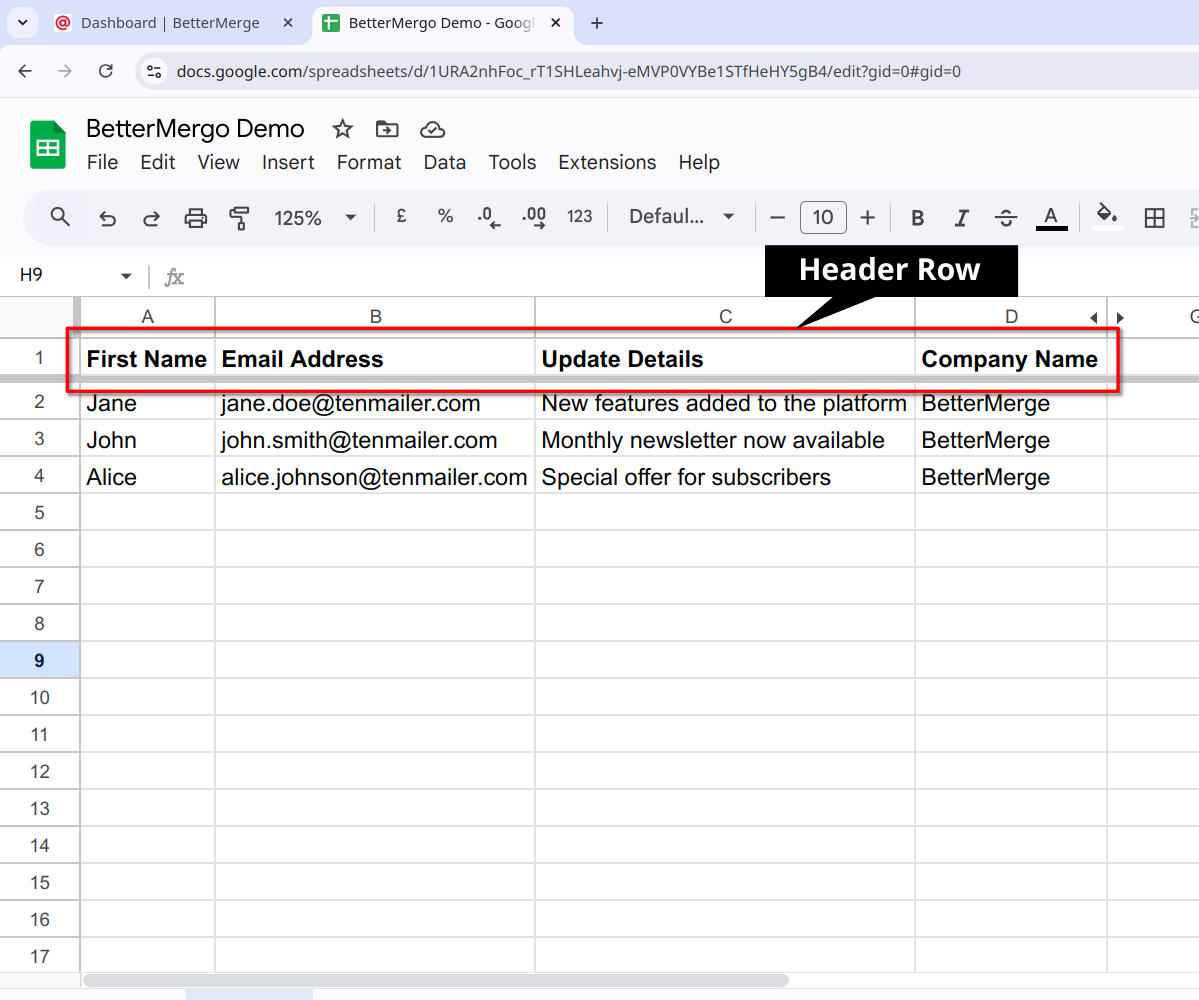
Put your list in a Google Sheet with a header row (Email, First Name, Company, and anything else you want to use).
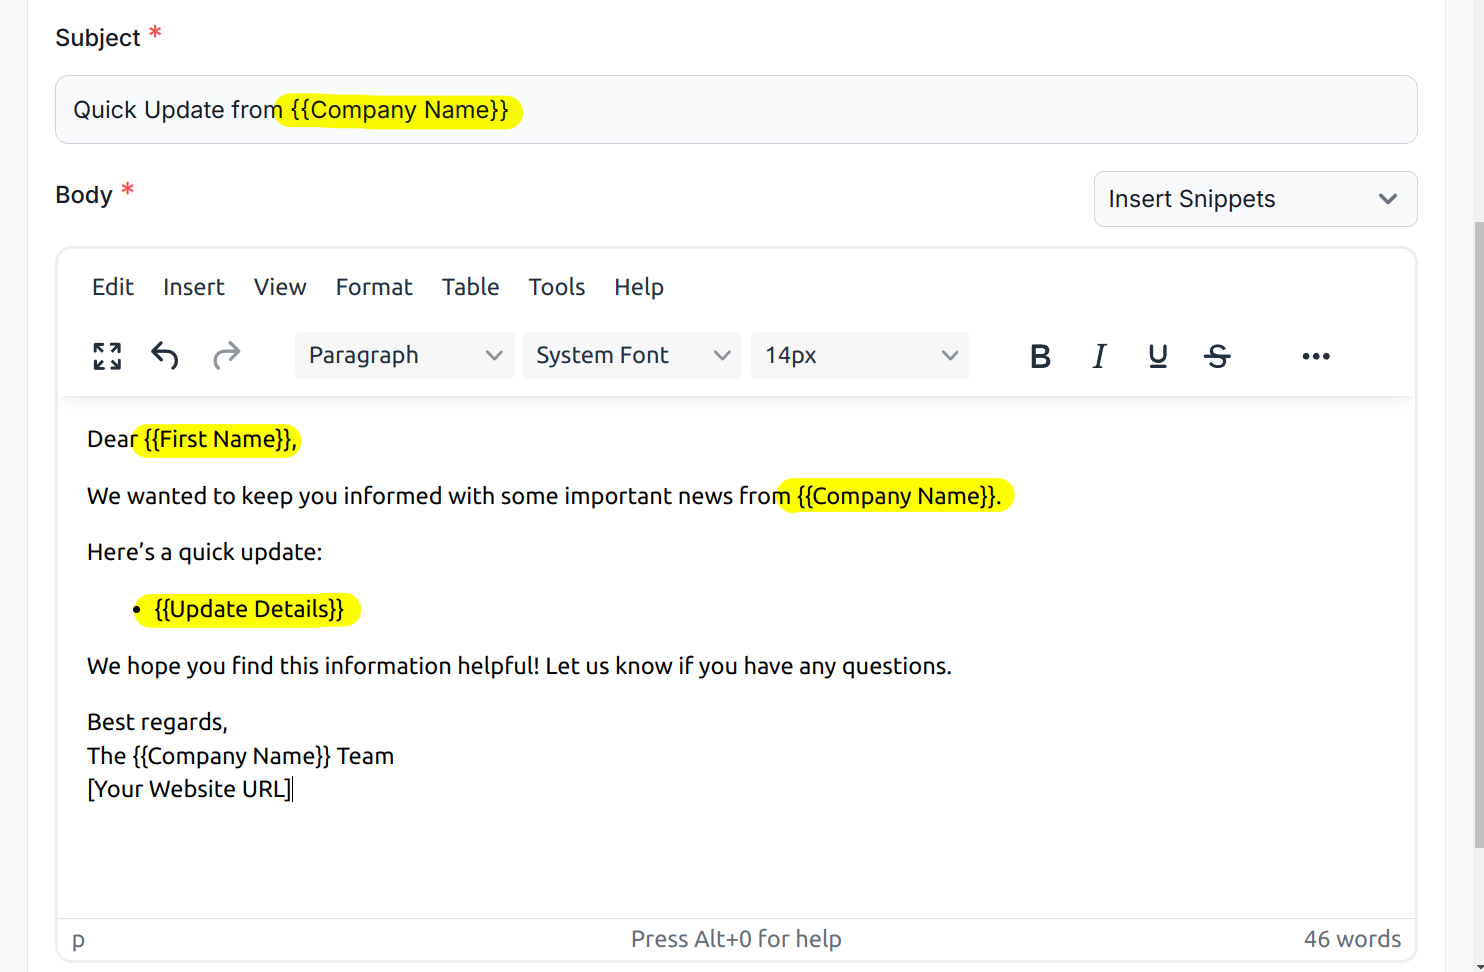
Write the email in BetterMerge, using the column names as merge tags in the subject and body.
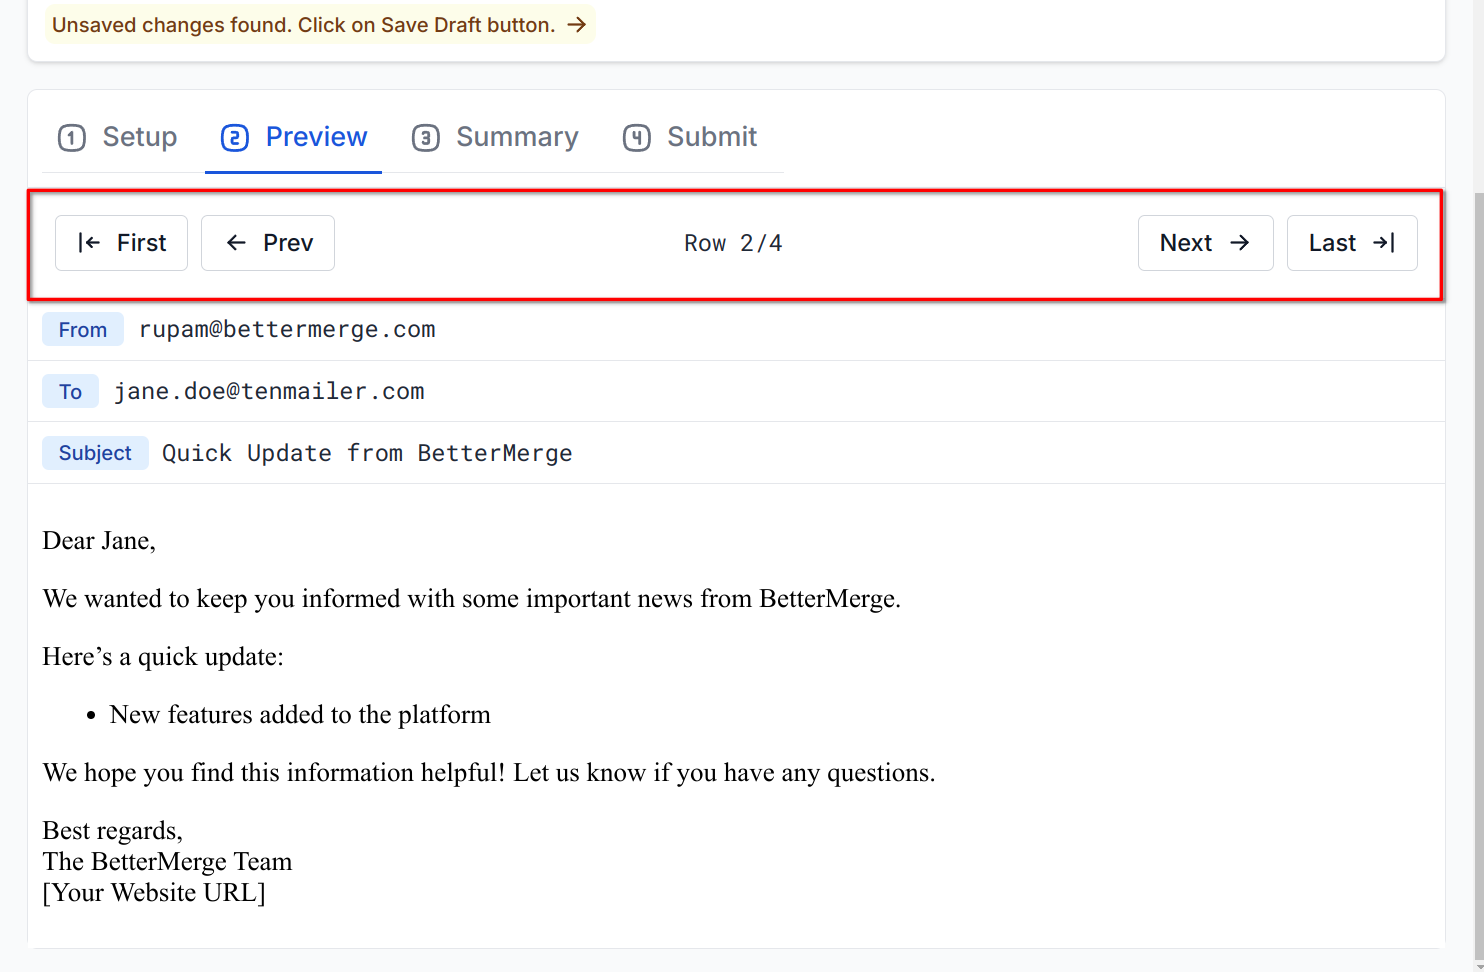
Preview a few rows to check that everything fills in correctly.
Send now, or schedule the campaign for later.
Where this becomes real automation is the part you’d otherwise babysit. Scheduled campaigns go out at the time you set. With delivery automation, you can cap how many emails go out per day, restrict sending to business hours, and let a large list spread across several days automatically. Open and click tracking then shows who engaged, so you know who to follow up with.
The free plan covers personalized sends of up to 50 emails a day. Scheduling and tracking start on the Lite plan, and delivery automation is on Plus and above. Plan details are on the pricing page.
Whatever tool you use, Gmail’s own daily limits still apply: 500 recipients a day on a personal Gmail account and 2,000 on Google Workspace. Our email quotas guide explains how they work.
Which one should you use?
Sending one email at a better time: Schedule send.
Answering the same question repeatedly: templates plus a filter.
Out of office: vacation responder.
The same fixed message on a schedule: Apps Script.
A personalized email to a list: mail merge.
Most people end up using two or three of these together. A common setup is a vacation responder for time off, a couple of filter-based replies for the most common questions, and a mail merge for anything that goes to more than a handful of people.
FAQ
Can Gmail send automatic follow-ups if someone doesn’t reply? Not natively. Gmail’s “nudges” only remind you to follow up; they don’t send anything. Automatic follow-ups need a dedicated tool or a custom Apps Script.
Is Gmail automation free? Everything in methods 1 to 4 is free with any Gmail account. Mail merge tools usually have a free tier with a daily cap and paid plans for higher volume.
Will automated emails hurt my deliverability? Scheduled sends and auto-replies behave like normal email. Sending to a large list is different: send individual emails rather than one big BCC, spread large sends out, and remove addresses that bounce. Our free spam checker helps you catch problems before you hit send.
Can I automate emails from a Google Sheet without an add-on? On an eligible Google Workspace plan, Gmail’s built-in mail merge can use a linked sheet, though it can’t be scheduled. Otherwise you can use Apps Script, if you’re comfortable writing code that loops over rows, fills in the text, and tracks what’s been sent. A mail merge add-on does the same job on any Gmail account and adds scheduling, tracking, and quota handling.
Writing the same email repeatedly can be time-consuming and inefficient, especially if you’re managing tasks like sending reminders, follow-ups, or business proposals. Fortunately, Gmail offers a feature that lets you create and save email templates for quick and easy use. Once set up, email templates allow you to send standardized messages with just a few clicks, saving you time and effort.
In this guide, we’ll explain how to create, manage, and use email templates in Gmail. Plus, we’ll introduce BetterMerge, a powerful mail merge add-on for Gmail and Google Sheets that can help you send personalized bulk emails efficiently.
Why Use Email Templates in Gmail?
Email templates are great for any repetitive communication. Here are some common scenarios where templates are useful:
Sending sales proposals or outreach emails.
Responding to customer support requests.
Following up after meetings or interviews.
Sending reminders for tasks or payments.
Managing newsletter campaigns.
Gmail’s template feature ensures that you don’t need to rewrite the same message each time, allowing you to stay organized and efficient.
How to Enable Email Templates in Gmail
Before you can create email templates, you’ll need to enable the feature in your Gmail settings.
Step 1: Open Gmail Settings
Log in to your Gmail account and click on the gear icon in the top right corner.
From the dropdown, click “See all settings”.
Step 2: Navigate to the “Advanced” Tab
Once you’re in the settings menu, navigate to the “Advanced” tab.
Look for the “Templates” option and click “Enable”.
Step 3: Save Changes
After enabling templates, scroll to the bottom of the page and click “Save Changes”.
The template feature is now enabled, and you can start creating templates!
How to Create Email Templates in Gmail
Now that templates are enabled, you can create your first template.
Step 1: Compose a New Email
Click the “Compose” button in the top left to open a new email draft.
Write the content you want to save as a template. You can include text, links, images, and even attachments (though attachments will need to be added manually when using the template).
Step 2: Save Your Email as a Template
Once you’ve written the email, click the three-dot menu in the bottom-right corner of the compose window.
Hover over the “Templates” option, and then click “Save draft as template” > “Save as new template”.
Step 3: Name Your Template
A pop-up will appear asking you to name your template. Choose a name that reflects the content (e.g., “Sales Follow-Up” or “Weekly Newsletter”).
Click “Save”, and your email is now saved as a template.
How to Use Email Templates in Gmail
Now that you’ve created an email template, here’s how to use it.
Step 1: Open the Compose Window
When you’re ready to use the template, click the “Compose” button to start a new email.
Step 2: Insert Your Template
In the compose window, click the three-dot menu in the bottom-right corner, hover over “Templates”, and then choose the template you want to use from the list.
The content from your saved template will automatically populate the email.
Step 3: Customize and Send
Once the template is inserted, you can customize the email if necessary (e.g., adding the recipient’s name or personal details).
Click “Send” when ready.
Managing and Deleting Gmail Templates
Gmail makes it easy to update or delete your existing templates.
Step 1: Update an Existing Template
To update a template, write the new version in the “Compose” window.
Click the three-dot menu, hover over “Templates”, and click “Save draft as template”.
Under the “Overwrite Template” section, select the template you want to replace with the updated content.
Step 2: Delete a Template
If you no longer need a template, click on the three-dot menu, hover over “Templates”, and click “Delete template”.
Select the template you want to delete, and it will be removed from your saved templates.
Benefits of Using Email Templates in Gmail
Efficiency: Save time by automating repetitive emails.
Consistency: Ensure that important information is conveyed consistently.
Professionalism: Respond to clients, customers, and colleagues quickly and with well-written, pre-approved messages.
Customization: You can always tweak the templates to add a personal touch before sending them.
Beyond the body of your email, a consistent and professional sign-off is also key. For tips on effectively managing your Gmail signature, you can find helpful information here.
Frequently Asked Questions (FAQs)
1. Can I use templates in the Gmail mobile app?
Unfortunately, Gmail does not currently support email templates in its mobile app. However, you can access and use templates on the desktop version of Gmail.
2. Can I add attachments to email templates?
While Gmail allows you to save text, links, and images in templates, attachments are not saved with the template. You’ll need to manually add attachments each time you use the template.
3. Is there a limit to how many templates I can create in Gmail?
There is no official limit to the number of templates you can create in Gmail. You can organize and create as many templates as you need.
4. How do I share email templates with my team?
Gmail does not have a built-in feature for sharing templates directly. However, you can copy and paste the template content into a shared document or email, and your team members can save it as their own template.
Boost Your Bulk Emails with BetterMerge
If you’re managing large volumes of emails or conducting email campaigns, you’ll benefit from using BetterMerge. BetterMerge is a powerful mail merge add-on for Gmail and Google Sheets that lets you personalize and send bulk emails easily. You can create a single template and customize each email with personalized fields like names, dates, and other details.
Conclusion
Gmail’s email template feature is a simple yet effective tool for anyone who frequently sends repetitive messages. By enabling and creating templates, you can save time, maintain consistency, and stay professional in your communications. Whether you’re handling customer inquiries, sending out newsletters, or following up on sales leads, email templates will streamline your process.
Sending emails at the right time can make a lot the difference. Whether it's for work, personal tasks, or marketing purposes, sometimes you want your emails to be delivered at a specific time. Gmail offers a handy feature that allows you to schedule emails for later.
In this guide, we'll walk you through the process of scheduling emails in Gmail, step by step. Plus, we’ll introduce BetterMerge, a mail merge tool for Gmail that lets you schedule your email marketing campaigns easily.
Why Schedule Emails in Gmail?
Scheduling emails gives you control over when your emails are sent. This is particularly useful if:
You’re emailing someone in a different time zone.
You’re working late but want the email delivered during business hours.
You need to follow up at the right moment.
Let’s explore how you can schedule emails in Gmail with just a few clicks.
Step-by-Step Guide to Scheduling Emails in Gmail
Step 1: Compose Your Email
First, log in to your Gmail account and click the "Compose" button in the top-left corner. This will open the email editor, where you can write your message as you normally would.
Step 2: Write the Recipient and Subject
Enter the recipient's email address in the "To" field. Then, write a subject for your email. Be sure to include any attachments or images as needed.
Step 3: Click on the Drop-Down Arrow Next to the "Send" Button
Once your email is ready to send, don’t click "Send" just yet. Instead, click the small drop-down arrow located to the right of the "Send" button. This will reveal a menu with a "Schedule send" option.
Step 4: Choose a Pre-Set Date and Time
After clicking "Schedule send", Gmail will offer a few pre-set options like "Tomorrow morning" or "Next Monday". If one of these works for you, simply click on it.
Step 5: Set a Custom Date and Time
If you prefer to choose your own time, click on the "Pick date & time" option at the bottom of the menu. This will open a calendar and clock interface where you can select the exact date and time you want the email to be sent.
After selecting your preferred time, click "Schedule send" to finalize.
Step 6: Confirm Scheduled Email
Once your email is scheduled, a confirmation message will appear at the bottom-left of your screen. You can always view or change scheduled emails by going to the "Scheduled" folder in Gmail’s left-side menu.
Managing Scheduled Emails
Editing a Scheduled Email
To change the content or the scheduled time of an email, go to your "Scheduled" folder, click on the email, and select "Cancel send". This will return the email to the "Drafts" folder, allowing you to edit it. You can then re-schedule the email by repeating the steps above.
Canceling a Scheduled Email
If you decide not to send the email, you can simply cancel it. Open the "Scheduled" folder, select the email, and click "Cancel send". This will move the email back to your "Drafts", where you can delete it if needed.
Benefits of Scheduling Emails in Gmail
Professional Timing: You can schedule emails to arrive in your recipient's inbox at the optimal time, increasing the likelihood of a response.
Global Communication: Perfect for sending emails across different time zones without working odd hours.
Enhanced Productivity: Batch-write emails and schedule them to be sent at different times throughout the day, helping you manage your workload efficiently.
Frequently Asked Questions (FAQs)
1. Can I schedule emails on the Gmail mobile app?
Yes, you can schedule emails on both Android and iOS Gmail apps. The process is the same as on desktop: after composing the email, tap on the three-dot menu next to the send button and choose "Schedule send".
2. Can I reschedule an email after scheduling it?
Absolutely. Just go to the "Scheduled" folder, open the email, and click "Cancel send". This will move the email to "Drafts", where you can adjust the send time and reschedule it.
3. Is there a limit to how many emails I can schedule?
There’s no specific limit on how many emails you can schedule, but Gmail does have general sending limits (e.g., 500 emails per day for individual Gmail accounts and 2,000 for G Suite users). Keep these limits in mind when scheduling a large number of emails.
Bonus: Schedule your email campaigns with BetterMerge
If you're frequently sending emails to multiple recipients and want to save time, consider using BetterMerge. BetterMerge is a powerful mail merge add-on for Gmail and Google Sheets, designed to send bulk personalized emails directly from your Gmail account. Whether you’re managing email marketing campaigns or just need to reach out to a large group, BetterMerge simplifies the process with customizable templates and easy scheduling options.
BetterMerge integrates seamlessly with Gmail’s scheduling feature, allowing you to send personalized emails at exactly the right time — automatically. It's the perfect companion to Gmail’s built-in scheduling tool for anyone looking to streamline their email workflow.
Conclusion
Scheduling emails in Gmail is a simple yet powerful way to ensure your emails are sent at the perfect time, helping you communicate more effectively. Whether you're working with international clients, managing a busy schedule, or simply looking to optimize your email outreach, Gmail’s scheduling feature has you covered.
To take your email game to the next level, try out BetterMerge, our mail merge solution for Gmail and Google Sheets. It's an excellent tool for scheduling your email campaigns while keeping the personal touch. With these tools in hand, your email strategy will be more efficient and productive than ever.
Sending personalized emails to a large group? It’s tedious and time-consuming. That’s where mail merge comes in—helping you automate the process while keeping the personal touch intact. In this ultimate guide, we’ll cover everything about using mail merge with Gmail. Whether it’s newsletters, invites, or follow-ups, you’ll learn how to save time and boost your email game. Plus, we’ll show how tools like BetterMerge make it even easier.
What is Mail Merge?
Mail merge is a smart way to send personalized emails to a large group without doing the hard work of writing each one individually. You create one email template with placeholders—like names or addresses—and then fill those in automatically using a data source, such as a spreadsheet. This saves you time and ensures every email feels personal, making communication smoother and more effective. With Gmail, Google Sheets and tools like BetterMerge, mail merge is easy to set up and use.
Example:
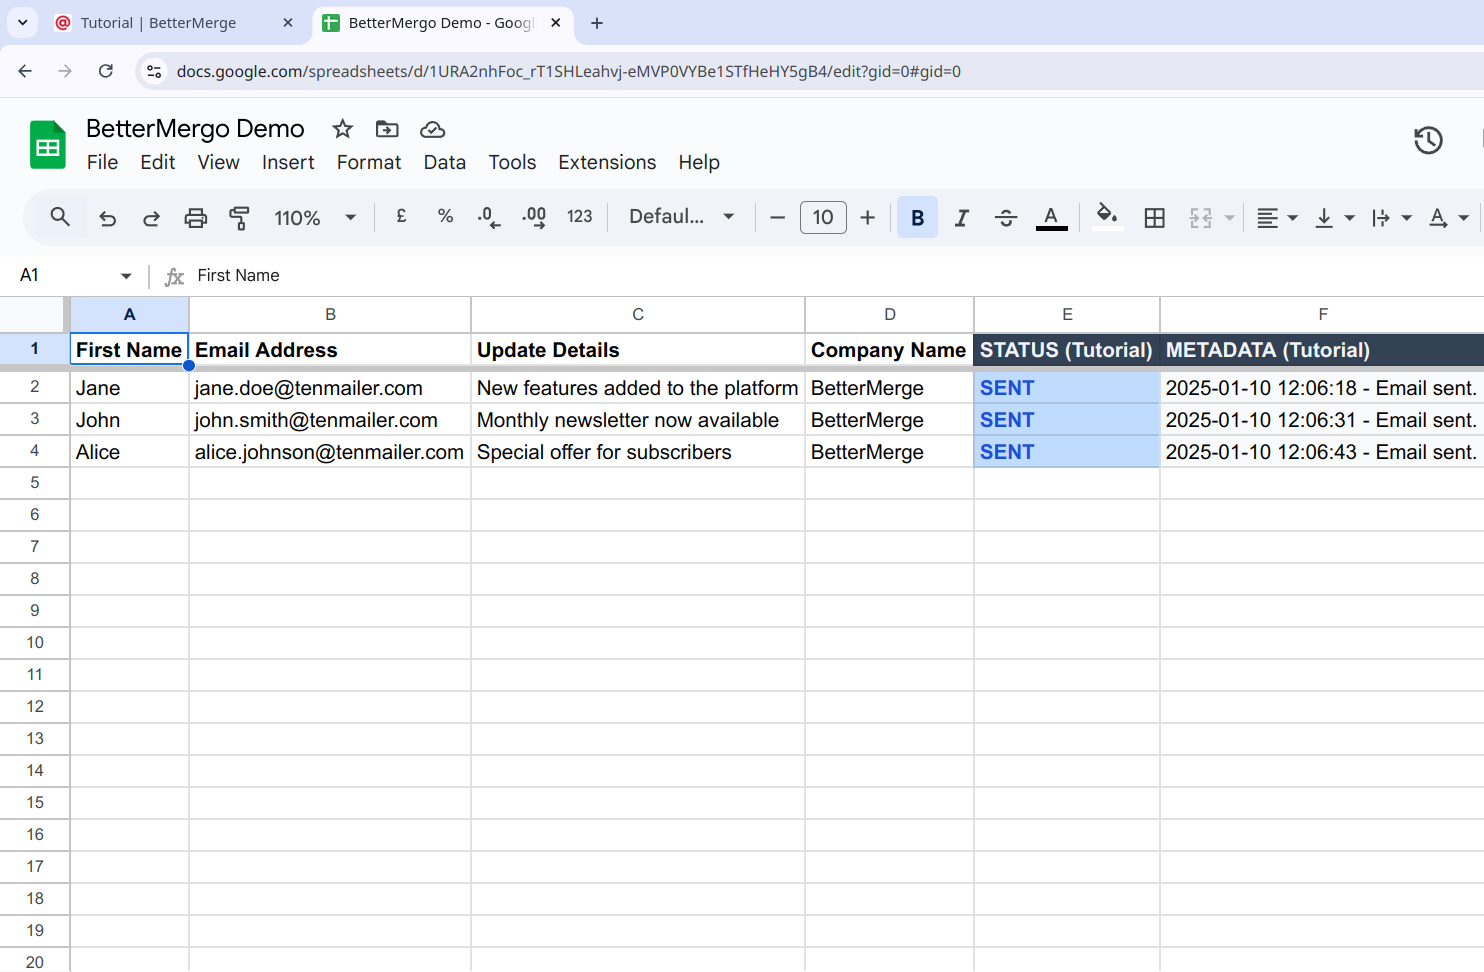
Imagine you have an email list in Google Sheets like this:
This is a reminder about the event scheduled for {{Event Date}}. We look forward to seeing you there!
Best regards,
[Your Name]
When you run the mail merge, the emails sent will look like this:
Email to John Doe:
Subject: Reminder: Upcoming Event
Body:
Hi John Doe,
This is a reminder about the event scheduled for 2025-02-01. We look forward to seeing you there!
Best regards,
[Your Name]
This is how mail merge automates the process while keeping emails personalized.
How to Set Up Mail Merge in Gmail with BetterMerge
Ready to send personalized emails in bulk without the hassle? Here’s how to set up mail merges in Gmail using BetterMerge.
Step 1: Prepare Your Email List in Google Sheets
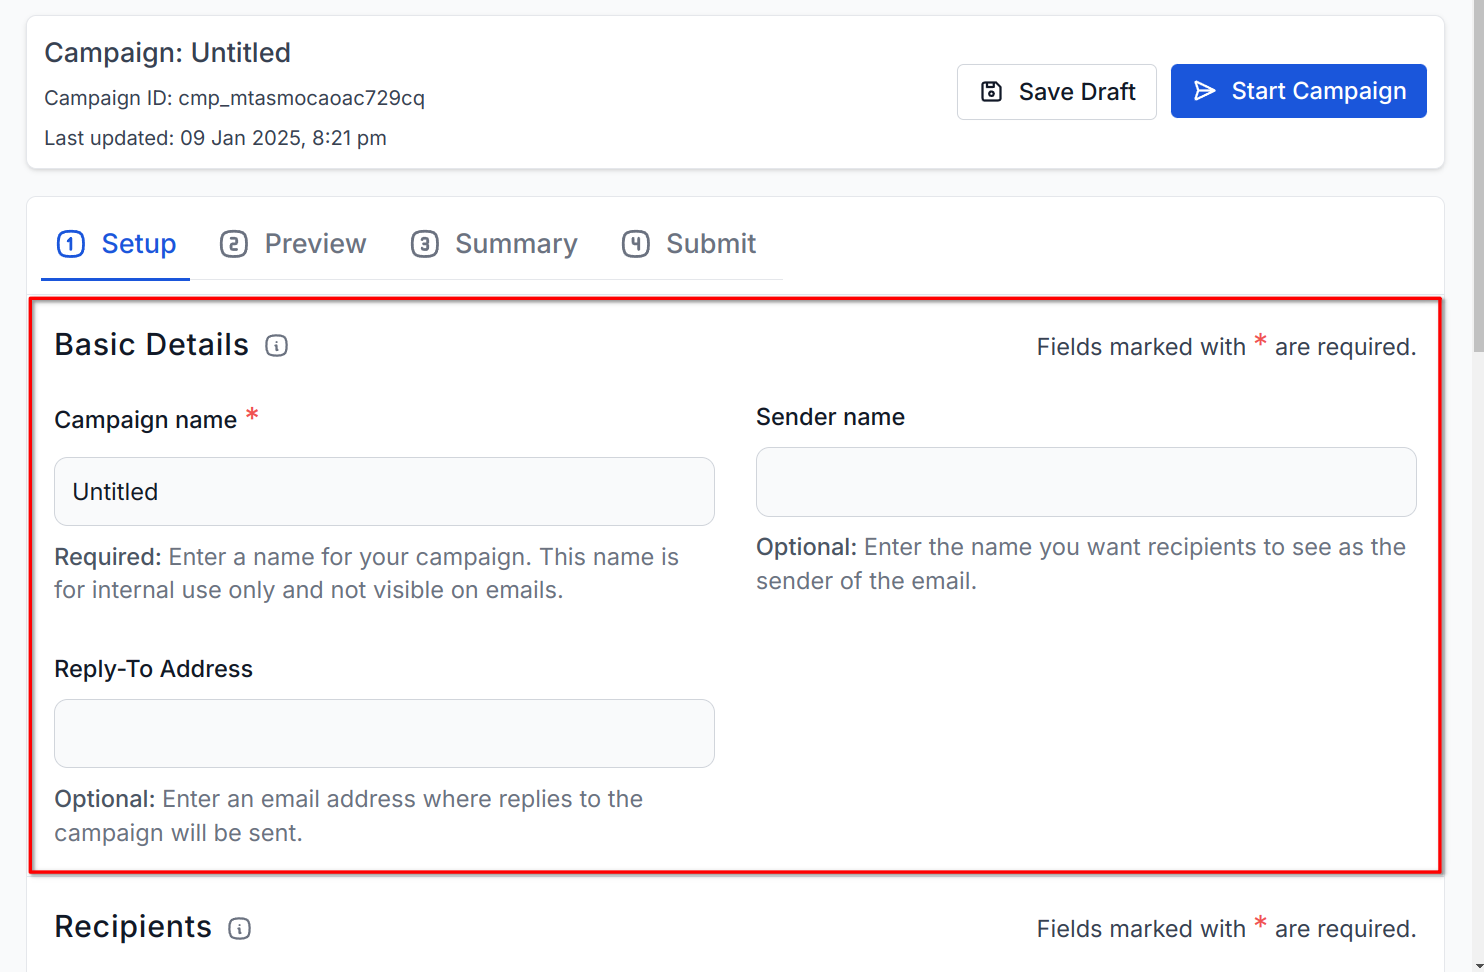
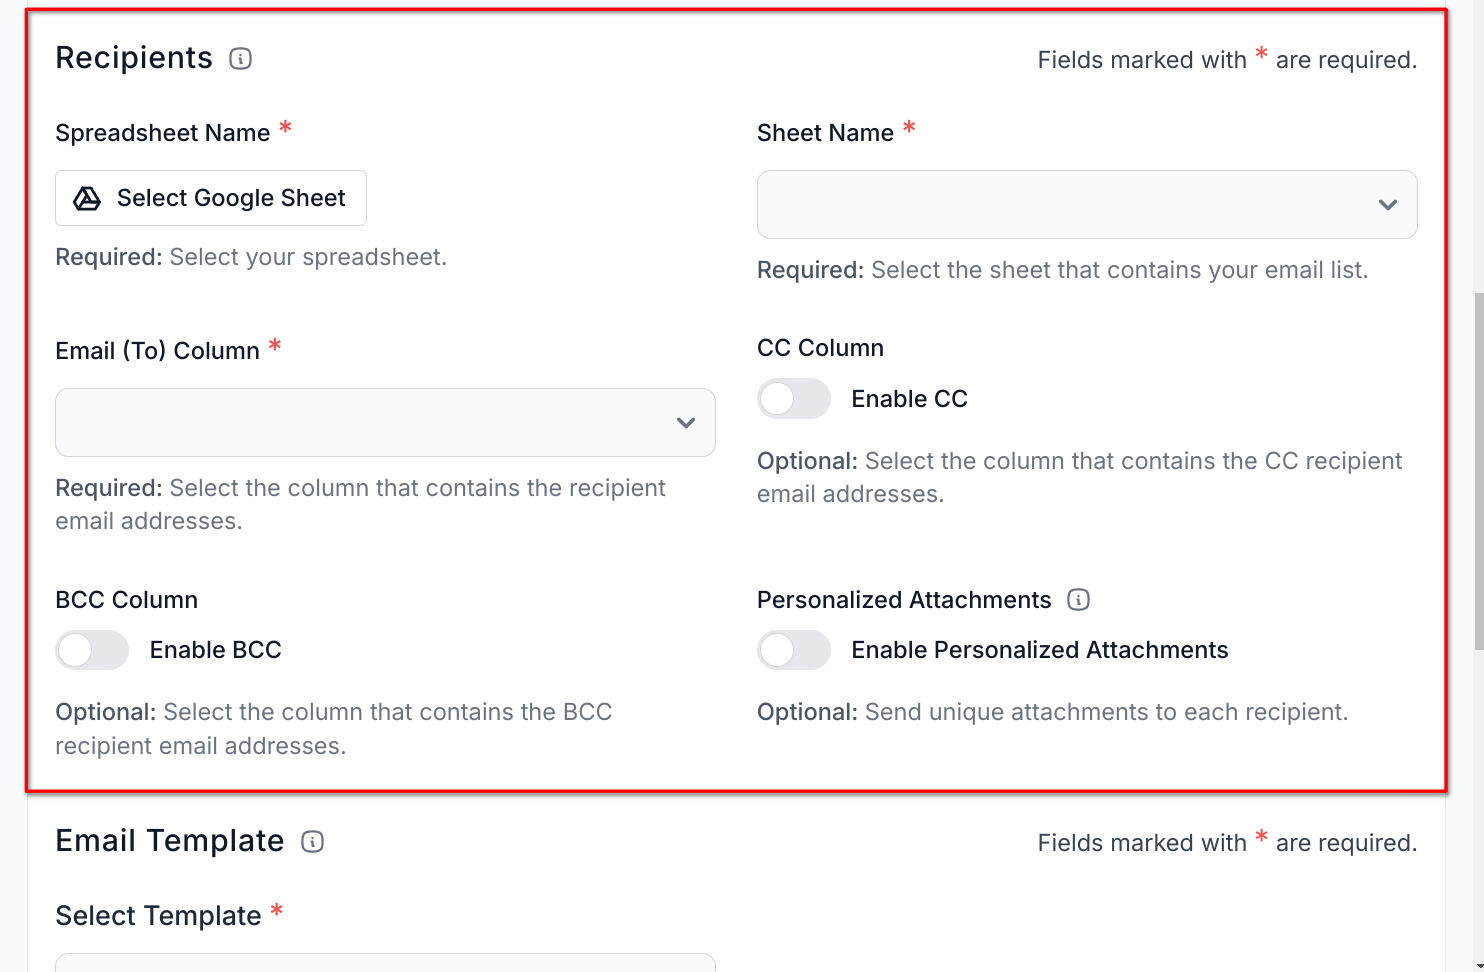
Start by preparing your contact list in Google Sheets. The first row (i.e. header row) should have the column names like First Name and Email. These column names will be used in your email template as placeholders, also called Merge Tags.
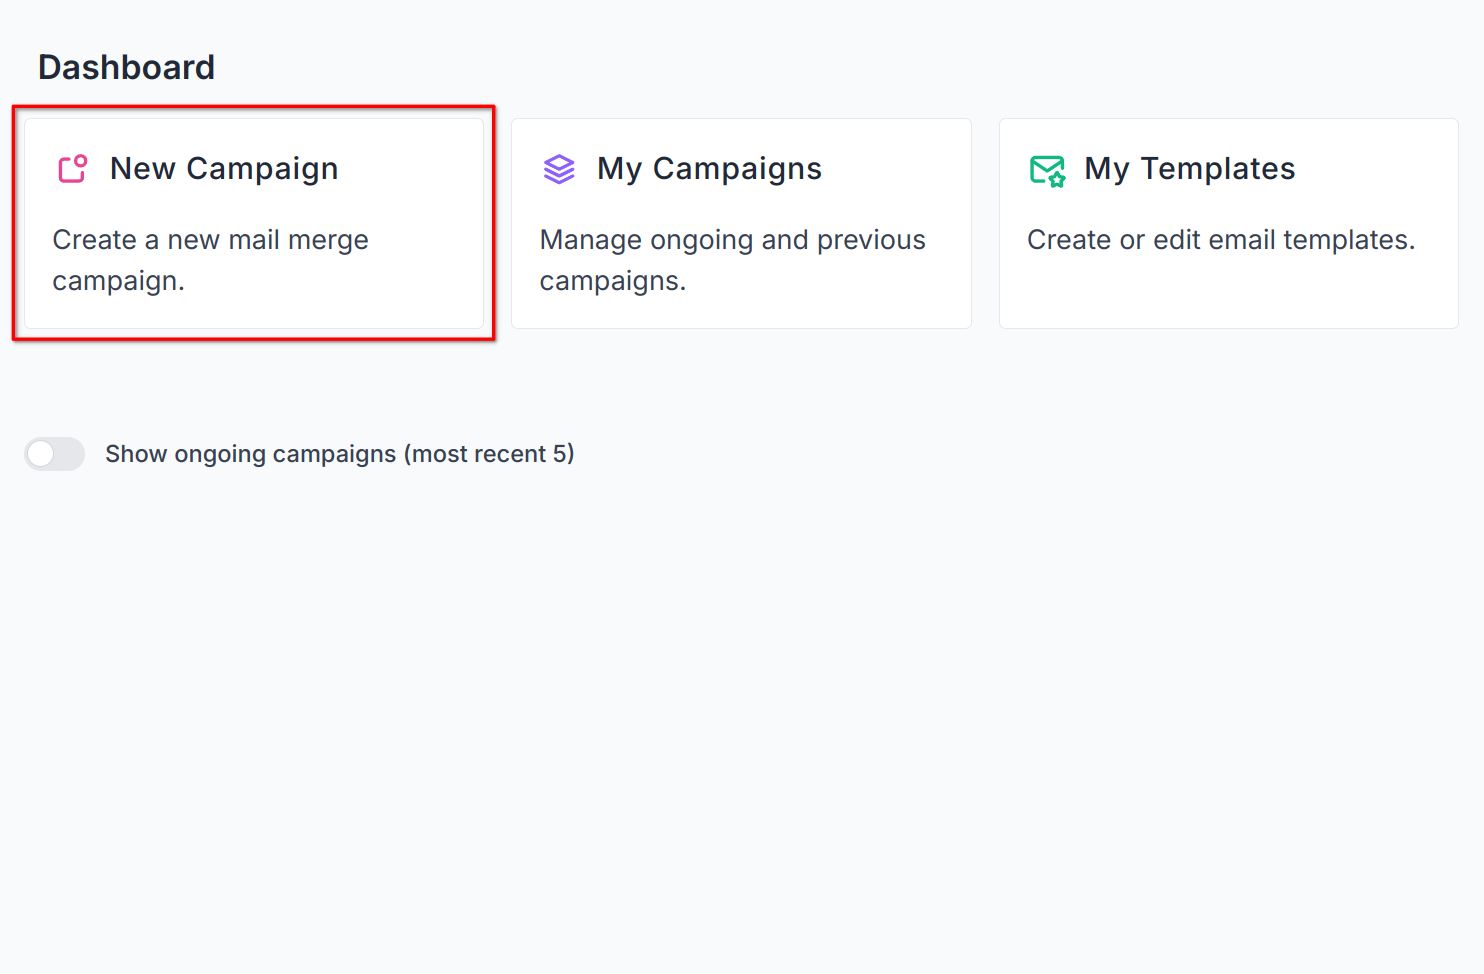
Step 2: Launch the BetterMerge add-on for Google Sheets or use the Web Dashboard
Select the Google Sheet containing your email list.
Step 4: Prepare Your Email Template
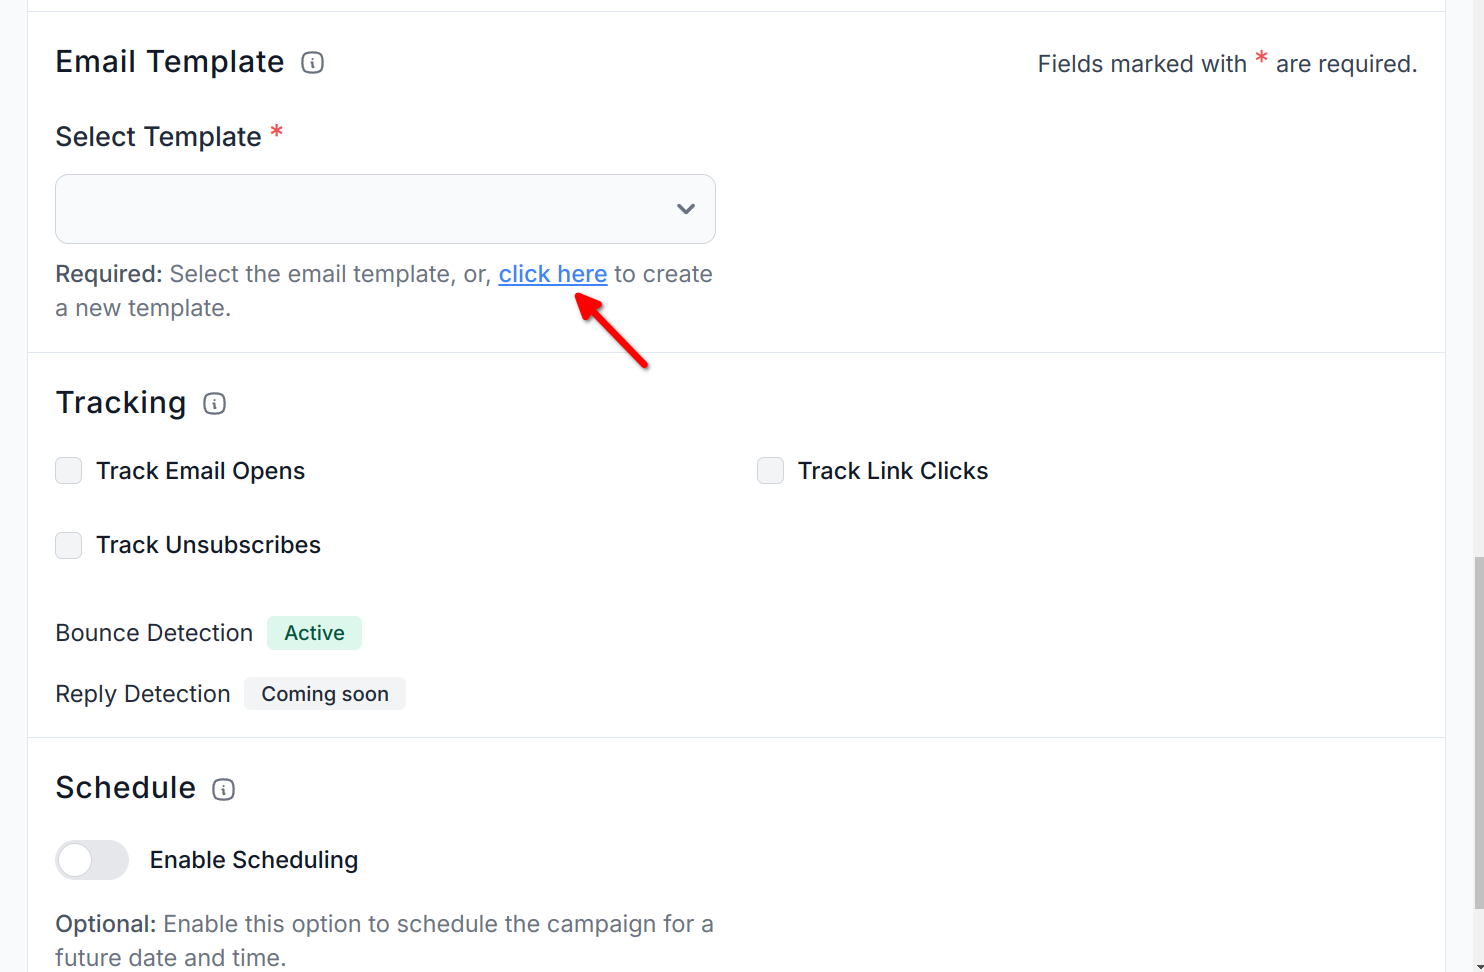
Create a new email template in BetterMerge.
Use merge tags to personalize your email. For example, if your Google Sheet has a First Name column, you can use {{First Name}} in your email template. When emails are sent, these placeholders will be replaced with the actual data from your sheet.
Step 5: Preview the emails
Before sending, preview the individual emails to make sure everything looks right. When you're ready, click Start Campaign to send your personalized emails.
Step 6: Start Your Mail Merge Campaign
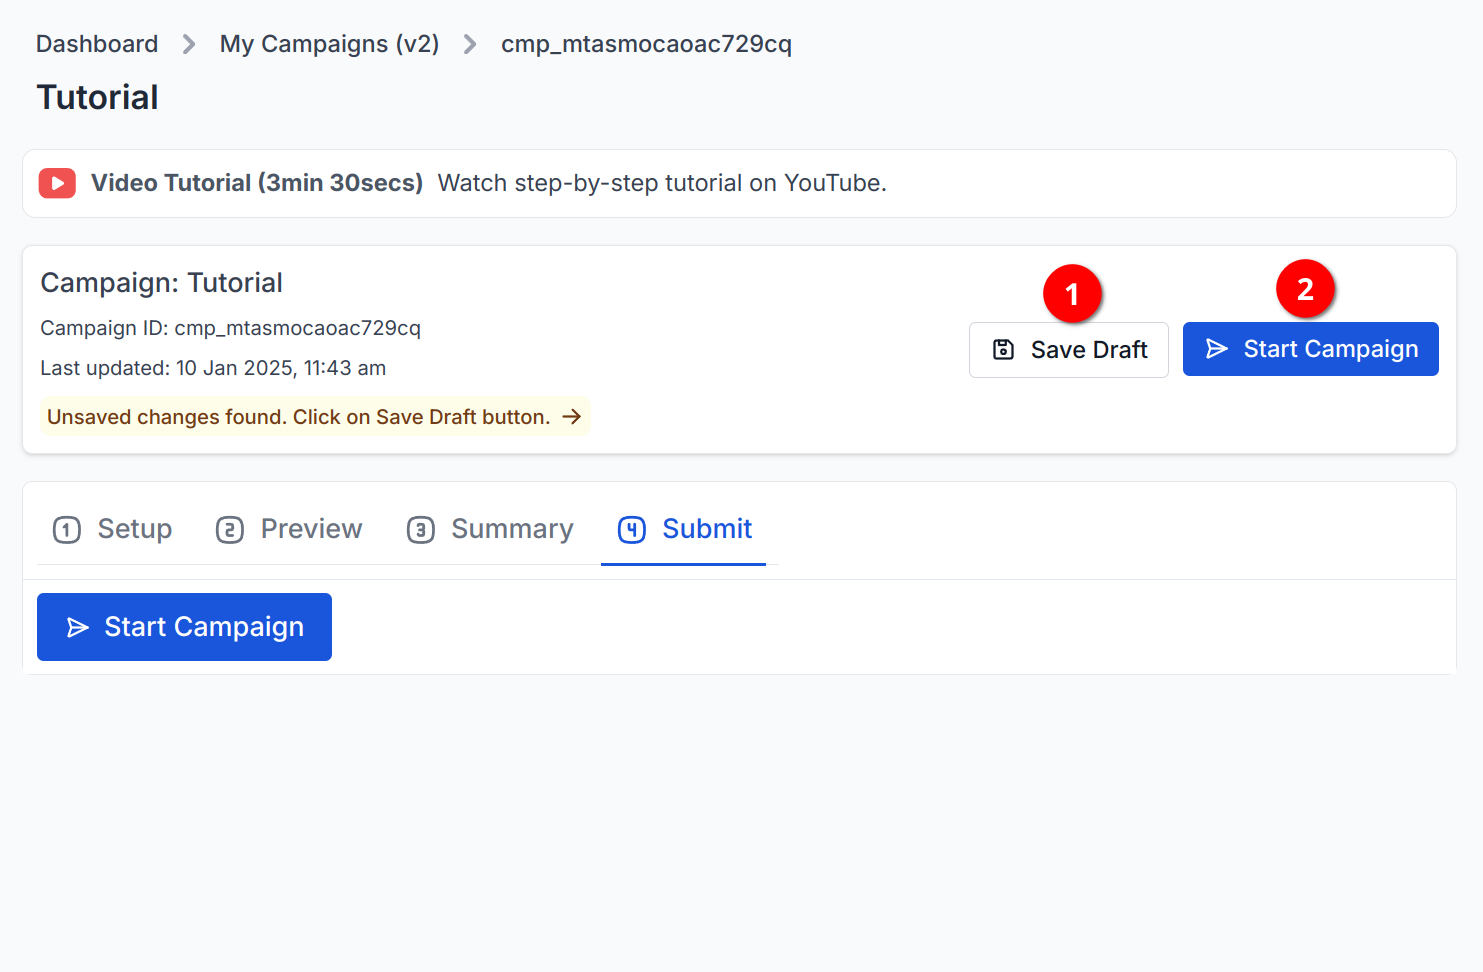
Save the campaign as a draft and start it.
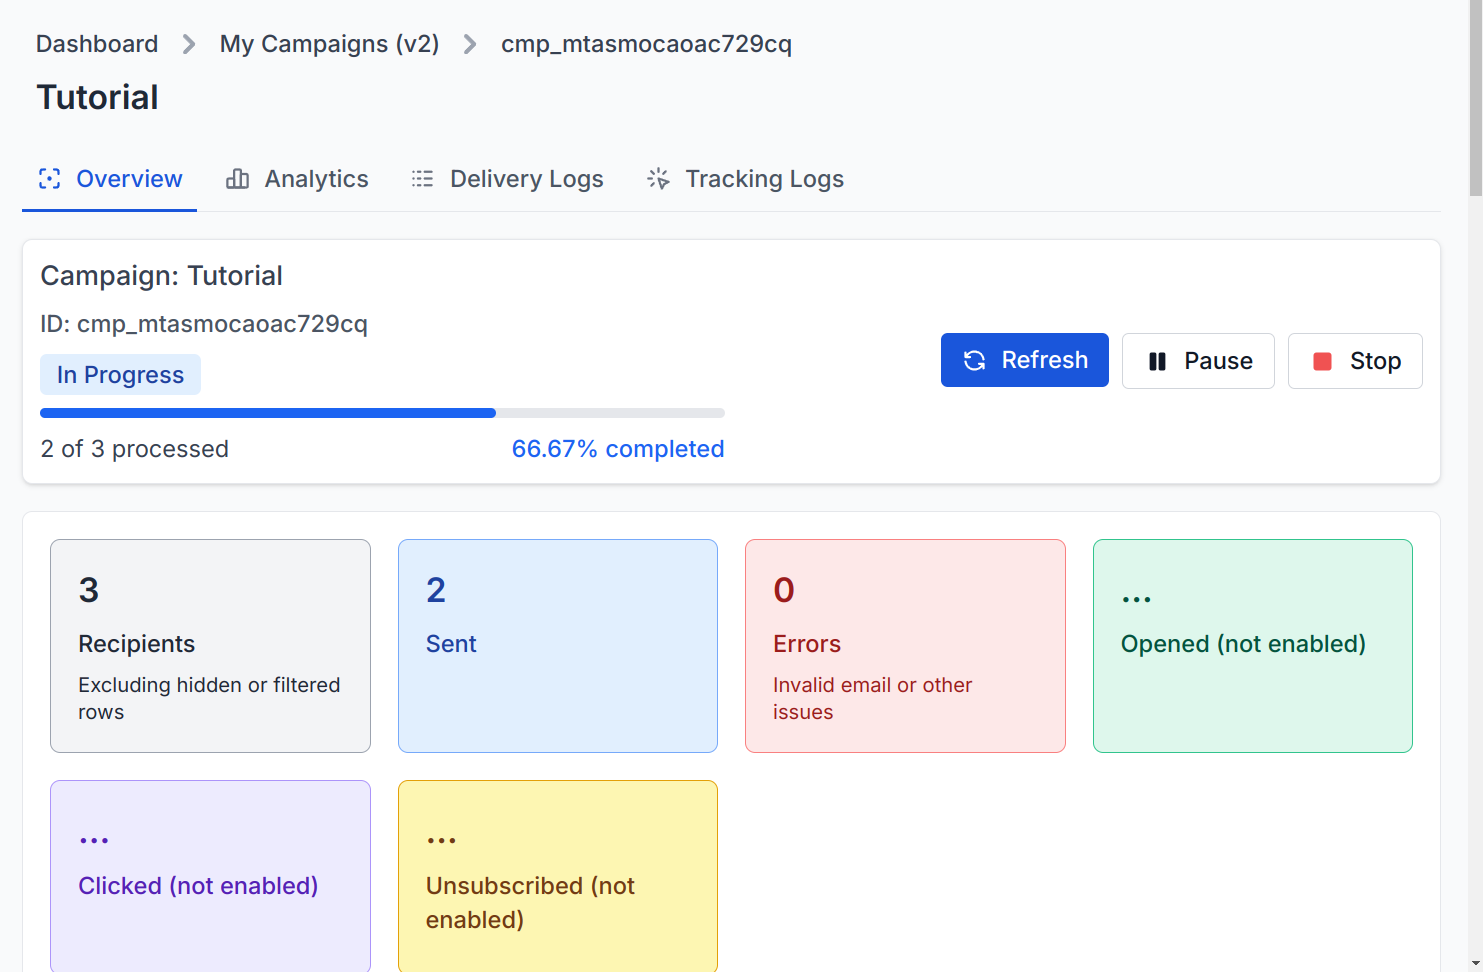
You can track your campaign progress in real time on the Campaign Report page and also on Google Sheets.
Mail merge with Gmail is incredibly useful for anyone who needs to send personalized emails to a large group. It simplifies the process and offers several key benefits that can make your email outreach more effective.
1. Personalize Your Emails
Mail merge lets you customize each email with details specific to the recipient, like their name or company. This makes emails feel more personal, which can increase the chances of them being opened and read. In fact, personalized emails have been shown to have 29% higher open rates and 41% higher click-through rates than generic ones (source: Experian). Personalization is no longer just a nice-to-have—it’s a must.
2. Save Time
Sending individual emails to dozens or hundreds of people is time-consuming. With mail merge, you only need to create one template, and tools like BetterMerge will automatically fill in the personalized details for each recipient. It’s a huge time-saver, especially when you’re working with large contact lists. Studies show that email marketing automation can save companies up to 30 hours per week by streamlining repetitive tasks (source: HubSpot).
3. Maintain Consistency
By automating the process, mail merge ensures that every email is consistent. You don’t have to worry about typos or missing information in some emails—everything is sent the same way to each recipient, making your communication more professional. According to DMR (source: Digital Marketing Ramblings), 72% of marketers agree that improving consistency across channels is key to building customer trust.
4. Improve Engagement
Personalized emails aren’t just a nice touch—they can also improve your engagement rates. Subject lines with personalized content have been shown to increase open rates by 50% (source: Campaign Monitor). So, by using mail merge, you’re more likely to get a response and keep your audience engaged. With BetterMerge, you're ensuring your emails reach people at the right time, with the right message.
5. Track Your Campaigns
Mail merge tools like BetterMerge allow you to track how well your emails are doing. You can see who opened your emails, clicked on your links, or unsubscribed. This data is important for understanding what’s working and making adjustments for future campaigns. 43% of email marketers say that measuring email campaign performance is one of their biggest challenges, but tools like BetterMerge make it easier to track metrics like opens, clicks, and unsubscribes (source: Litmus).
6. Low Cost
Compared to traditional email marketing platforms, using Gmail with mail merge tools like BetterMerge is a cost-effective solution. It’s accessible for businesses of any size, even if you're just starting out and working with a smaller budget. In fact, email marketing offers the highest ROI of any digital marketing strategy, with a return of $42 for every $1 spent (source: Litmus).
Best Practices for Effective Mail Merges
To get the most out of your mail merge campaigns, here are some key practices to follow:
1. Segment Your Audience Instead of sending one generic message to everyone, break your recipients into smaller groups based on interests or behavior. Studies show that segmented campaigns can increase open rates by up to 14% (Source: Mailchimp). This helps you send more targeted, relevant emails, boosting engagement.
2. Personalize Beyond Names Personalization is more than just inserting someone’s first name. Use available data to make the email feel like it was created specifically for them. For instance, if a recipient has shown interest in a certain product, highlight that product in your email. Relevant content makes your email stand out.
3. Write Compelling Subject Lines The subject line is the first thing your recipients will see, so make it count. A strong subject line can increase open rates by up to 50% (Source: OptinMonster). Keep it short, clear, and relevant. Avoid being overly salesy; instead, create curiosity or offer something valuable.
4. Always Test and Preview Before hitting send, always preview your emails. A small error can undermine your professionalism, and a broken link or formatting issue can reduce engagement. You’d be surprised how often overlooked mistakes slip through, costing you potential conversions.
5. Watch Your Deliverability Keep an eye on how many of your emails are actually landing in inboxes rather than the spam folder. A good practice is to send emails in smaller batches, especially when you’re just getting started, to avoid being flagged as spam. Around 21% of legitimate marketing emails end up in spam (Source: ReturnPath), so be careful.
6. Have a Clear Call to Action (CTA) Every email should have a single, clear CTA. Whether it’s “Sign up now” or “Learn more,” make it obvious and easy to follow. A CTA placed in the middle of an email can boost click-through rates by up to 27% (Source: Campaign Monitor).
7. Plan Follow-Up Emails Not everyone will respond to your first email, so plan strategic follow-ups. A well-timed reminder can increase your conversion rate by 30% (Source: Yesware). Make sure your follow-ups feel relevant, personalized, and timely, based on the recipient’s interaction with your original email.
8. Analyze and Improve After you send your mail merge, take a moment to review key metrics: open rates, click-through rates, and conversions. This data is invaluable for understanding what worked and what didn’t. By continuously refining your campaigns based on these insights, you’ll keep improving over time.
By following these best practices, your mail merge campaigns will be more effective, helping you connect with your audience in a meaningful way while boosting your results.
Common Use Cases for Mail Merge with Gmail
Mail merge with Gmail can make your day-to-day communication easier and more personalized. It’s perfect for everything from sending marketing emails to following up with clients or keeping your team updated. Here are a few ways it can help you get things done more efficiently.
1. Marketing Campaigns Personalized marketing emails drive higher engagement. Whether you’re sending newsletters, product updates, or special offers, mail merge allows you to customize content for each recipient. Research shows that personalized emails can increase revenue by up to 6x (Source: McKinsey). Tailoring your message increases relevance and conversion rates.
2. Sales Follow-Ups Automating personalized follow-up emails for leads ensures no opportunity is missed. After the initial contact, send messages tailored to each prospect's interest or behavior. Sales engagement can jump by 70% with timely and personalized follow-ups (Source: Salesforce). This can significantly push leads through the funnel.
3. Event Invitations & Reminders Mail merge makes sending invitations for events (virtual or in-person) efficient and personal. You can include event-specific details like time, location, or speaker information and adjust the tone of the message based on the recipient’s past engagement. Personalized event invitations increase attendance rates by as much as 30% (Source: Eventbrite).
4. Customer Outreach & Retention Reaching out to existing customers with personalized offers or appreciation notes strengthens loyalty. Personalized outreach increases customer retention by 17% (Source: Invesp). Regular check-ins, thank-you notes, or birthday emails can go a long way in building long-term relationships.
5. Surveys & Feedback Requests Gathering feedback through surveys becomes easier with mail merge. By sending personalized requests, you increase the likelihood of a response. Emails tailored to a recipient’s past interactions can boost response rates by up to 50% (Source: HubSpot). Personalized requests make people feel valued and more inclined to participate.
6. Internal Team Communications Mail merge isn’t just for external communication. You can use it internally to send personalized updates, reminders, or meeting agendas to your team. This helps ensure consistent messaging across departments and improves internal efficiency.
7. Job Applicant Communication Managing candidate communication can be tedious, but mail merge simplifies it. Send personalized application status updates, interview invitations, or thank-you notes. Personalized communication can significantly improve the candidate experience, making it easier to engage and retain top talent.
8. Seasonal Promotions Send targeted seasonal offers, like holiday discounts or special promotions, to different segments of your audience. Personalizing these messages based on customer behavior or past purchases can drive more sales during peak times. Studies show that personalized seasonal campaigns can boost conversions by 20% (Source: Omnisend).
9. Customer Onboarding For new customers or clients, personalized onboarding emails can guide them through your product or service. You can send them step-by-step instructions, welcome notes, or special offers tailored to their needs. A good onboarding experience can increase customer satisfaction by 33% (Source: Wyzowl).
Mail merge brings efficiency, personalization, and professionalism to a variety of communication needs. Whether you're engaging customers, following up on sales, or managing internal processes, mail merge can make your workflow smoother and more impactful.
Top Mail Merge Add-Ons for Gmail & Google Sheets
When setting up a mail merge for Gmail, BetterMerge (formerly Mailway Mail Merge) stands out with its comprehensive features and ease of use. While other add-ons are available and offer various functionalities, BetterMerge provides a robust and seamless experience. Here are some of the top options to consider:
BetterMerge (formerly Mailway Mail Merge)
Features: Easy-to-use, privacy-first (absolutely minimal permission requirements) and secure mail merge solution. Offers both Google Sheets add-on and web-dashboard. Includes personalization, scheduling, delivery throttling, real-time tracking and more essential features.
Best For: Users looking for an user-friendly and reliable mail merge tool with a strong focus on privacy and security.
Rating in Google Workspace Marketplace: 4.9 Stars
Yet Another Mail Merge (YAMM)
Features: Easy-to-use mail merge with support for Google Sheets. Includes email tracking, automatic follow-ups, and template customization.
Best For: Users seeking a straightforward and user-friendly mail merge tool with basic tracking features.
Rating in Google Workspace Marketplace: 4.7 Stars
Mail Merge with attachments
Features: Allows sending personalized emails with attachments directly from Gmail. Supports integration with Google Sheets for data management.
Best For: Users needing to include attachments in their mail merge emails, such as documents or reports.
Rating in Google Workspace Marketplace: 4.3 Stars
Mail Merge (By Quicklution)
Features: Offers mail merge functionality with Gmail and Google Sheets. Includes email scheduling, tracking, and template creation.
Best For: Users looking for scheduling features along with mail merge capabilities.
Rating in Google Workspace Marketplace: 4.9 Stars
Mailmeteor
Features: User-friendly mail merge with real-time tracking and analytics. Integrates with Google Sheets and offers a variety of customization options.
Best For: Users who need a simple interface and effective tracking for their email campaigns.
Rating in Google Workspace Marketplace: 4.9 Stars
Each of these add-ons provides unique features that can cater to different needs and preferences. Evaluate them based on your specific requirements to find the best fit for your mail merge needs.
Troubleshooting and FAQs
If you're having trouble with mail merge, here are some common issues and how to resolve them:
1. Why aren’t my emails being sent? Possible causes: Double-check your email template and data source for any errors. Make sure BetterMerge is correctly connected to your Google account. Also, confirm that you're not hitting Gmail’s sending limits. If the issue persists, try refreshing your connection or checking for any Google account restrictions.
2. My personalization placeholders aren’t working. What should I do? Possible causes: Ensure that your placeholders in the email template exactly match the column headers in your Google Sheet. Even small typos or mismatches can cause issues. If everything looks fine and it’s still not working, try reloading your data and template to refresh the connection.
3. Why are my emails bouncing or not being delivered? Solution: If you're receiving bounce-back messages, check the error details to understand the cause. Common reasons for delivery issues include invalid email addresses or full inboxes. Clean up your contact list by removing invalid addresses, and consider using an email verification tool to reduce future bounces.
4. Can I send attachments with my mail merge? Solution: Yes, BetterMerge supports both regular and personalized attachments. For regular attachments, just add the file to the email template, and it will be included in all emails. To send personalized attachments, create a "Attachment" column in your Google Sheet with specific public Google Drive links for each recipient.
5. How can I track the success of my campaign? Solution: Use BetterMerge’s built-in tracking features to measure key metrics such as open rates, click-through rates, and responses. This data will help you assess how well your emails are performing and make improvements for future campaigns. Tracking results can guide you in refining your approach.
6. My emails are marked as spam. What should I do? Solution: To avoid being flagged as spam, follow best practices like avoiding overly promotional language, including an unsubscribe option in your emails, and maintaining a good sender reputation. Review Gmail’s sending guidelines to ensure compliance. A warm-up period for your email account might also help improve deliverability.
7. Can I integrate BetterMerge with other tools? Solution: BetterMerge is flexible and can integrate with a variety of other platforms. If you're interested in a specific integration, feel free to reach out to us at [email protected] with your request. We’ll work with you to explore available options and help you get the most out of your tools.
If you’re still facing issues or have more questions, consult our help documentation or contact our support team at [email protected] for further assistance. We’re happy to help!
Advanced Tips and Tricks
To really get the most out of your mail merge campaigns, here are some advanced strategies to consider:
1. Dynamic Content Insertion Take personalization to the next level by dynamically inserting content into your emails based on recipient data. For example, you can create conditional statements to tailor your message based on factors like location, purchase history, or past interactions. This helps make your emails feel more relevant and engaging.
2. A/B Testing for Better Results Run A/B tests on different parts of your email, such as subject lines, content, or calls to action. By testing what works best for your audience, you can refine your approach and improve overall campaign performance. Small tweaks can lead to big improvements in open rates and conversions.
3. Automate Follow-Ups Don’t let any opportunities slip through the cracks. Set up automated follow-up emails based on your recipients’ actions or responses. For example, if someone opens your email but doesn’t click the link, you can automatically send a reminder or a special offer. This keeps the conversation going without extra effort on your part.
4. Target Your Audience More Effectively Segment your email list into smaller, more specific groups based on behaviors, interests, or other criteria. Using data from your Google Sheet, you can create personalized segments and send targeted messages that are more likely to resonate with each group. More precise targeting leads to better results.
5. Use Merge Tags for Extra Personalization Go beyond the basics and use merge tags to add dynamic content like product recommendations, event details, or location-specific offers. This adds another layer of personalization and increases the chances of your recipients engaging with your email.
6. Integrate with CRM Tools If you use a CRM (Customer Relationship Management) tool, syncing it with your mail merge can help you manage your data better and streamline communication. This ensures your email lists are always up to date, and you can track interactions across multiple platforms.
7. Optimize Send Times Find the best times to send your emails by analyzing past recipient engagement patterns. Use BetterMerge’s scheduling and throttling features to send emails at optimal times, based on the recipient’s time zone or typical engagement habits. This small adjustment can significantly improve your open and click rates.
8. Monitor, Learn, and Improve After sending out your mail merge, don’t just forget about it. Continuously monitor how your emails are performing, and use the data you gather to adjust your approach. Look at open rates, click-through rates, and responses, and tweak your strategy for future campaigns.
By applying these tips, you’ll be able to take your mail merge campaigns to the next level, increasing engagement and ensuring better results with less effort.
Conclusion
Mail merge is an incredibly effective tool for sending personalized emails at scale, saving you time and improving your communication. When you use BetterMerge (formerly Mailway Mail Merge) with Gmail, you can take your outreach to the next level, making your emails more relevant and engaging while reaching more people efficiently.
Throughout this guide, we’ve covered the basics of mail merge, its advantages, step-by-step setup, best practices, common use cases, and some advanced strategies. Whether you’re running marketing campaigns, managing event invites, or engaging with customers, mastering mail merge can drastically improve your workflow and impact.
As you start using BetterMerge, be sure to keep an eye on your results. Regularly analyze your email performance and fine-tune your approach based on feedback and data. With BetterMerge, you have the tools and flexibility to improve your email communication and achieve your goals more easily.
Thanks for reading, and we wish you success with all your mail merge campaigns!